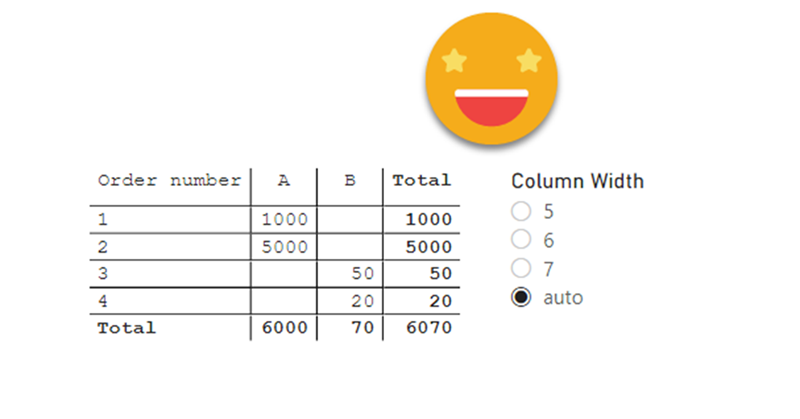
Ok, I have maybe gone a bit overboard with the title, but I think it has some advantages over other hacks out there to establish the column widths of matrix, so here I am to explain how I came up with it and how to use it.
The first hack I saw was from Ben Ferris (aka The Power BI Guy) which added a dummy measure with a number of 0 to make the width (having automatic width enabled) and then it would disable automatic widths and remove the measure. Nice. But of course, if new columns appear you’ll need to set the thing again. Something similar happens with the approach of Bas, who skips the dummy measure thing and instead just plays with the format string to show the evenly wide number. His approach is cooler because you skip the measure thing, but you have the same weak points.
However, Bas’s video got me thinking on the topic and the role of format strings…
You may know from other posts that I have a thing for format strings. They are very powerful if used wisely. And with calculation groups you can make all sorts of calculations to build a format string which can be different for each filter context combination (i.e. each cell of your matrix). Soooo… could I make a format string which would add like spaces on the left side in a way that all numbers become equally wide? Sounded feasible at least, so I gave it a try. I created a calculation group with a single calculation item where the value expression is just SELECTEDMEASURE() and the Format String Expression looked like this
version 1 =
VAR currentValue =
    SELECTEDMEASURE ()
VAR currentLength =
    LEN ( TRIM ( CONVERT ( currentValue, STRING ) ) )
VAR extraSpaces = 10 - currentLength
VAR prefix =
    REPT ( " ", extraSpaces )
RETURN
    """" & prefix & """"
        & SELECTEDMEASUREFORMATSTRING ()
Looks all pretty well laid out, doesn’t it? I get the value of the measure, I convert it to a string, then I trim it (in case power bi is already taking the extra spaces I am planning to add) and then I get the length of it. Then I calculate how many extra spaces it needs to reach my desired width of, say, 10. Then I create a «10-x» space string (without Ben’s hack I would not have thought of that probably) and then I add these extra spaces «protected» with double-double quotes as I do when I want a string to show «as is», no matter what (like I did on the dynamic labels at the end of the time series). Fail-proof right? Wrong.
Here is my table before applying the calculation item

and here is afterwards…
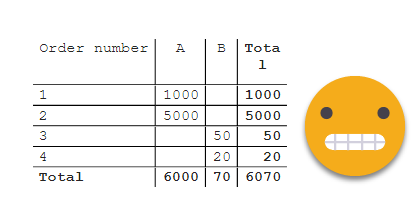
As you can see it failed miserably. Not only it did nothing with column B, it looks like it did something with the total and made it show in two lines, which makes no sense at all. I tried with other characters, and it did work, so it had to do something with the spaces. For example with underscores:
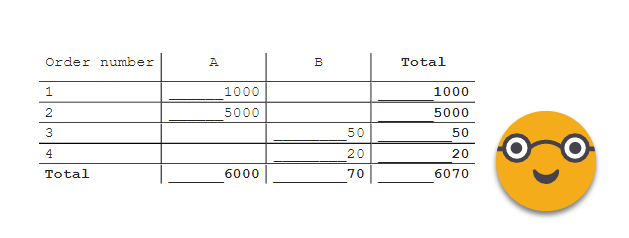
Of course underscores were not the solution. I realized Power BI had some sort of trimming of format strings in place so I had to think some way of fooling it. Putting a smallish character first and then the spaces did not work either. Spaces are not respected in format strings, or not quite. Different number of spaces produced the same spacing.
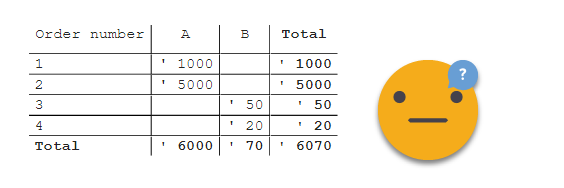
Then I thought that whatever is in place, it probably targets the normal space, the UNICHAR(32) one. But Unicode is huge and there must be a bunch of other spaces I can use. After finally managing to show the language toolbar in my machine, I tried with the double-width space form Japanese input (I knew I would use it some day!) and it kinda worked, but those are some big fat spaces, and I wanted something more comparable to the regular character width (that’s why I set courier new as font anyway). So looking all over the place I ended up in this page of Wikipedia with a pretty long list of Unicode characters with the decimal encoding I needed for the UNICHAR function. So I looked for «space» in the page and found the «Non-breaking space». I have no idea what is it good for, but I tried with it UNICHAR(0160). Also I remembered that Format String Expression is evaluated before the Value expression so there’s no need to trim the string before getting the length. Trimming would probably not get rid of these weird spaces I was trying anyway. So the format expression of my calculation item now looked like
version 5 =
VAR currentValue =
    SELECTEDMEASURE ()
VAR currentLength =
    LEN ( CONVERT ( currentValue, STRING ) )
VAR extraSpaces = 10 - currentLength
VAR prefix =
    REPT ( UNICHAR ( 0160 ), extraSpaces )
RETURN
    """" & prefix & """"
        & SELECTEDMEASUREFORMATSTRING ()
And did it work? You bet it did!

So the approach worked!
From there we can industrialize it to make it work in any scenario. Could we have different widths ready so we don’t have to enter to tabular editor to modify the desired width? We could just copy the calculation item, and replace the number on each of them… or we could use the name of the calculation item in the calculation item expression! (which is super-cool)
I made a new calc group just to get away from all the testing junk I created, and made one calculation item called just «5» with this format string expression
5 (format string expression) =
VAR currentValue =
    SELECTEDMEASURE ()
VAR currentLength =
    LEN ( CONVERT ( currentValue, STRING ) )
VAR selectedLength =
    CONVERT (
        SELECTEDVALUE ( 'Column Width'[Column Width], currentLength ),
        INTEGER
    )
VAR extraSpaces =
    IF ( selectedLength > currentLength, selectedLength - currentLength, 0 )
VAR prefix =
    REPT ( UNICHAR ( 0160 ), extraSpaces )
RETURN
    """" & prefix & """"
        & SELECTEDMEASUREFORMATSTRING ()
When using selected value on the calculation group column, always provide an alternate value, not sure why, but otherwise I got errors once, so I always do it.
Then copy paste the calculation item, and just rename it to 6, 7 … the more the merrier. And then you can do stuff like this (or just tug it into the filter pane as a normal person)

Now you may think I already over-stretched the topic, but maybe we can do one more thing. What if we added an «auto» in the slicer, so that it would make all the columns the same, but only wide enough to show the values it needs to show. With some more DAX, we can have the auto-mode. Instead of getting the number hard-coded or from the calc-item name (which is also quite hard-coded), we could find the largest value in the visual and then measure its length. We can then decide if we want some padding or just wide enough for all numbers to show, your choice. To do that, the dax for the format string expression looks like this
Auto =
VAR currentValue =
    SELECTEDMEASURE ()
VAR currentLength =
    LEN ( CONVERT ( currentValue, STRING ) )
VAR maxValue =
    CALCULATE (
        MAXX (
            SUMMARIZE ( 'Sales', 'Sales'[Order number], 'Sales'[Customer] ),
            SELECTEDMEASURE ()
        ),
        ALLSELECTED ( sales )
    )
VAR maxLength =
    LEN ( TRIM ( CONVERT ( maxValue, STRING ) ) ) //+ X if you want some padding
VAR extraSpaces =
    IF ( maxLength > currentLength, maxLength - currentLength, 0 )
VAR prefix =
    REPT ( UNICHAR ( 0160 ), extraSpaces )
RETURN
    """" & prefix & """"
        & SELECTEDMEASUREFORMATSTRING ()
The sad part is that is no longer dynamic, so you’ll have to modify that for the table at hand. If anyone knows how to do it, please let me know!
But anyway, it’s super cool
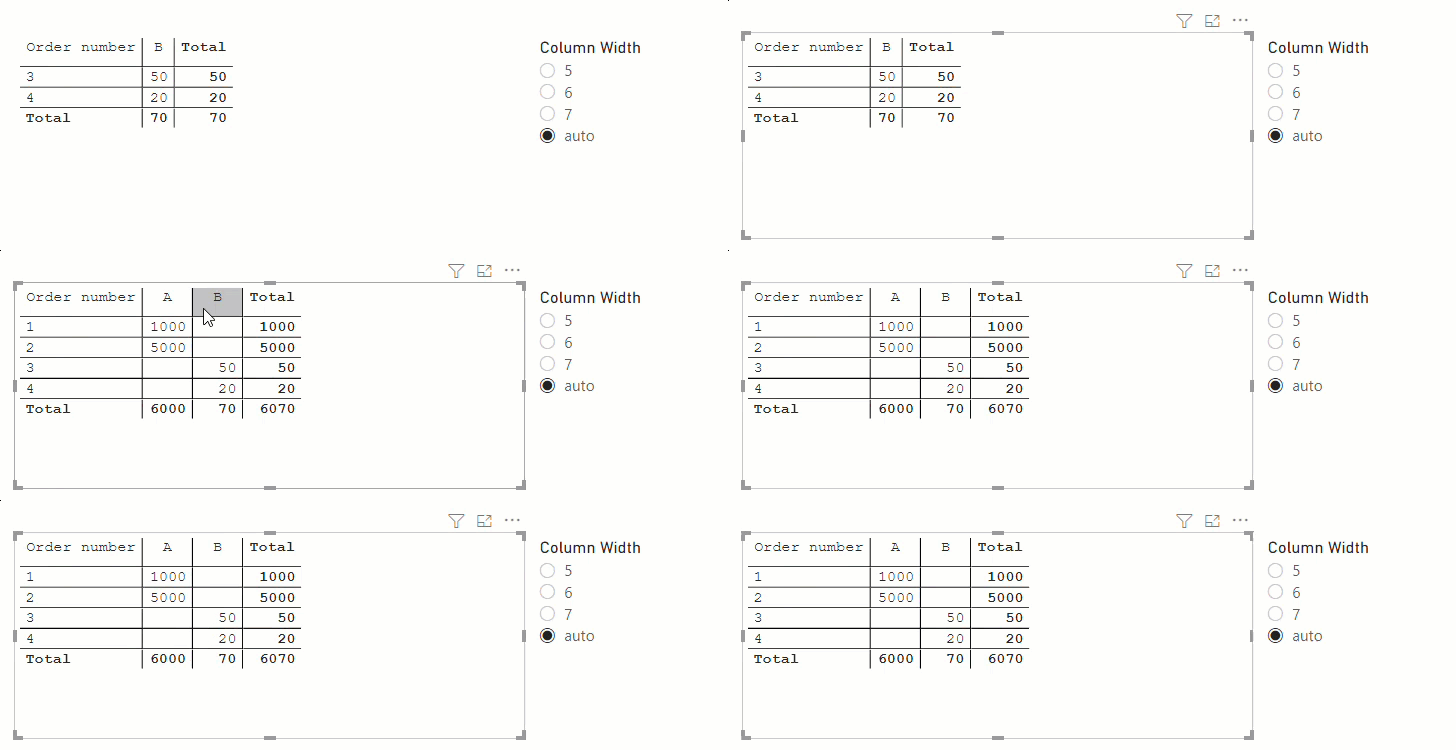
That’s it. Maybe the next Power BI Desktop update will finally offer some decent commands on column widths and this article will become obsolete, but then how would you know that Non-breaking spaces are respected in format strings?
Anyway, just to recap, this approach is better than other approaches in the sense that you set it once and you can forget about it because even if new columns appear they will have the same width. With auto mode that’s even more true, but you’ll have to type a little bit of dax to include the dimensions that you are using in your matrix. Some people may say that the downside is that you need to create a calculation group, but I don’t see it that way ?
Thank you for reading all the way here! Greatly appreciated.
PS. If you just want to play with the file for a while, download the pbix and knock yourself out!
PS from 23-Nov-2021: If you think this should be baked in power bi, go vote this idea
