Validating migrations or how to properly compare tables

No calculation groups today. I decided I would document something that I’ve found myself doing quite a lot recently and I guess that other people might experience the same. Migrations. That’s what happens when somebody decides that SAP Business Objects needs to die and be replaced by Power BI. Or that a the tables generated by processes orchestrated by Windows scheduler runing batch files that open access files with an autoexec macros that in turn execute a mixture of internal operations but some on a SQL Server stored procedures should at least be moved to a proper SSIS package (totally making it up, right?). All these things. At the end of the day you need to be sure that whatever was generated with the old way of doing things, gets created in the new way too. This is something that not much effort is devoted to do, but with some techniques you can have a tool that will speed things a lot.
I’m not talking of calculation groups, I’m talking about Power Query! Yes, it’s not my thing, but when I get something working I’m quite happy too. First things first, not everyone knows powerquery so depending on the organization you will be elevated to a semi-god just by showing that you can do joins between tables of completely different data sources. Sometimes this can be Pre-Production and Production servers, but in others one side can be a temporary table from an access file. Whatever is needed.
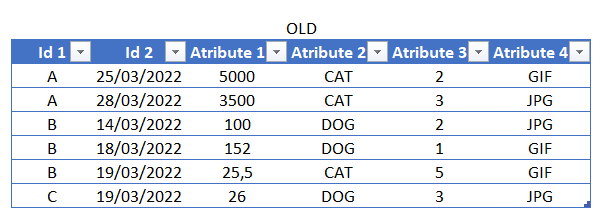
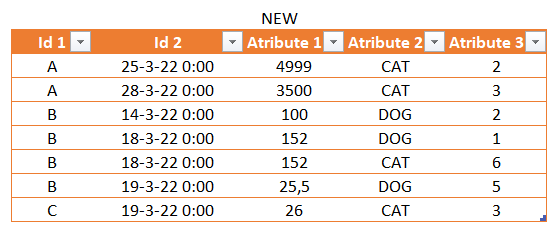
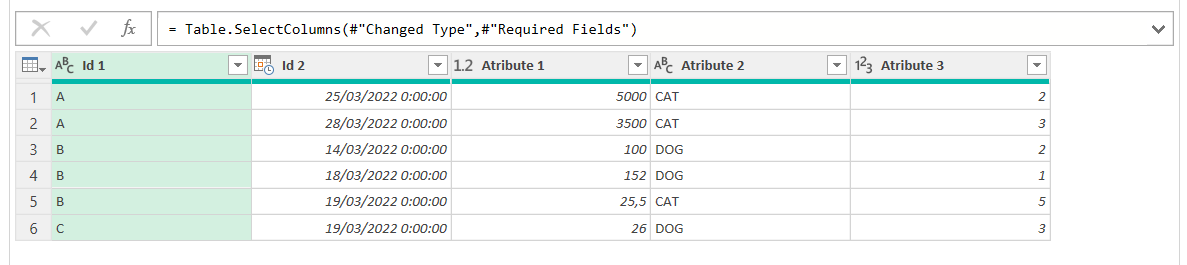
Here are the tables that we want to compare — remember that there’s no need for them to be excel tables, each of them could be just anything: An excel extrat, a SQL query, a DAX query, an Access table (yes, Access) and a long etc. I’m just showing them here to get an idea of what we’re comparing. I’m going to use Excel, but needless to say if you want to use Power BI is exactly the same.
1. Get the tables
The first thing we need to do is to build two queries, one from the old data source and from the new. This will be different depending on your source so I’m not going to go in detail. If you are comparing snapshots of sql tables you might want to set up parameters for range start and range end so you can easily compare other dates or even a range of dates. Anyway, once we are set we should have two queries.
2. Select the fields to compare
Sometimes we need to do a little cleanup before comparing. During migrations sometimes people realize that there’s like 15 columns that nobody even remembers what they are for and that should be removed. This is normally documented in an excel table, which is something we can use. If you don’t have this and it’s just all to all you can skip to the next point.
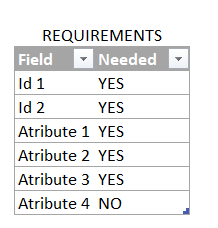
We need to constrain the comparison only on the selected fields. We’ll to it in both tables because in the new one we could have also additional columns we do not want to include in the comparison. For such a small tables we could just do it manualy, but here we’re discussing a methodology that allows us to compare any two tables without going field by field checking if its a required one or not. A methodology that keeps our life not-miserable if we are migrating a 50 column table.
As in many things in Power Query, the easiest approach is to do something through the UI and on a few columns and then figure out how to make it dynamic instead of hard-coded. So we’ll select a few columns and select «Remove Other Columns» and see what happens.
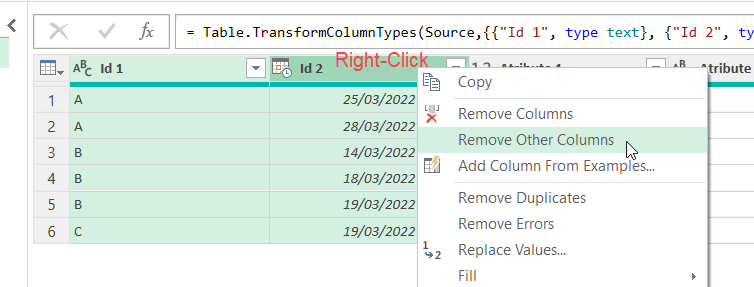
The resulting formula is not too tough
= Table.SelectColumns(#"Changed Type",{"Id 1", "Id 2"})
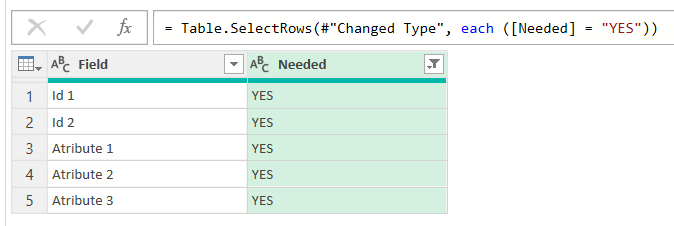
So we just need a list with the names of the columns we need to keep. The way I do it is, first filter out the NO’s:
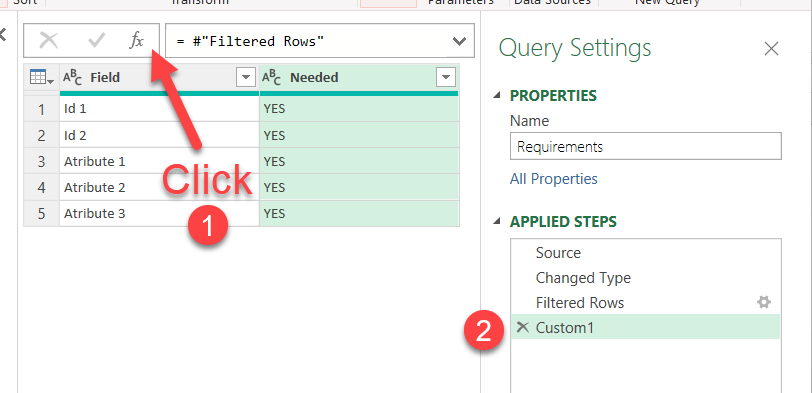
then add a custom step clicking on the fx sign of the formula
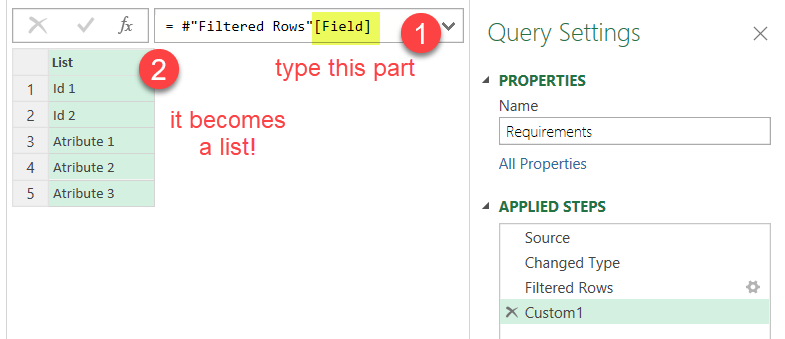
and just append the field name (in this case is called «Field») in square brackets. When we refer to a column this way it actually returns a list with all the values, just what we need!
This step can also be accomplished from the UI by right clicking on the column and selecting «Add as new query» (very last option). In this case though it will, well, create a new query. Either way, let’s call the resulting query «Required Fields»
Anyway, now that we have the list of fields we want to keep (remember this could be like 50 fields out of a total of 87) it’s time to use it in our original formula.
Instead of
= Table.SelectColumns(#"Changed Type",{"Id 1", "Id 2"})
we’ll now replace the hard-coded list with our fancy dynamic list
= Table.SelectColumns(#"Changed Type",#"Required Fields")
and yes! only the required fields indeed reamain in the table, how cool is that?
While me might have different field names in each table, we’ll just assume they are the same for now. Anyway, changing field names is tragic for any downstream reporting that will be modified to point to the migrated data source so if you can keep the original fields names (even if they are *ugly*) just do it. They don’t need to be the *real* names in the database. Just make sure you keep a view with the original field names so that nothing breaks if they point to the new source. That said, comparisons with different names can be done — we’ll just leave that for the end not to get too messy now.
As I said before, it’s good to do that on both «New» and «Old» queries to make sure we have the same fields. As a bonus we’ll get them in the same order, as they will show in the order of our array. At this point if your NEW query is missing any of the required fields this will cause an error. If that’s the case skip the step and we’ll see in a second who is the offending field. By the way, remember that Power Query is *very* case sensitive!
3. Check the Metadata
So we might have two tables that look similar colum-wise or we want to see where the diferences are so it’s time to check metadata before we can compare the data.
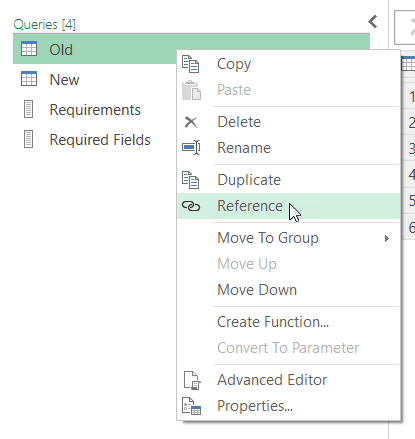
Create one new query from OLD and one from NEW with the Reference command of the right-click menu.
Let’s call them «Old Schema» and «New Schema». You can just modify the source step which just points to the original query, and add Table.Schema in front like
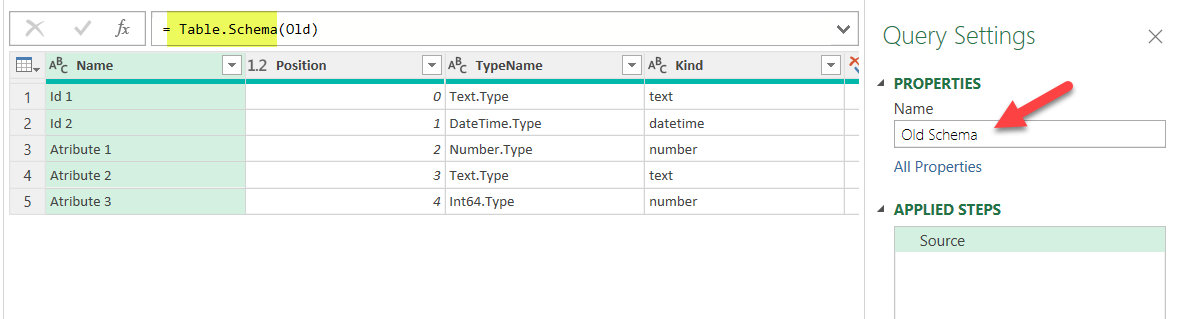
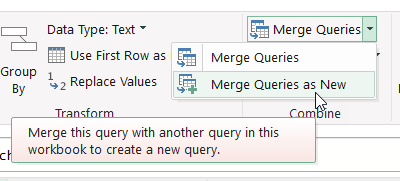
As you see we get the metadata of our queries. Field names, order, types etc. So let’s compare both — we need to make sure that fields exist with the same name in both queries and with the same type. Well, if we are using diferent sources (Analysis Services vs Excel or whatever) we might get different TypeName descriptions for things that Power Query considers the same, so we’ll consider just the «Kind» column when comparing. Select the «Old Schema» query and select Merge Queries –> Merge Queries as New
Now select the New Schema (you did it for both right?) and select join by Field Name and Full Outer.
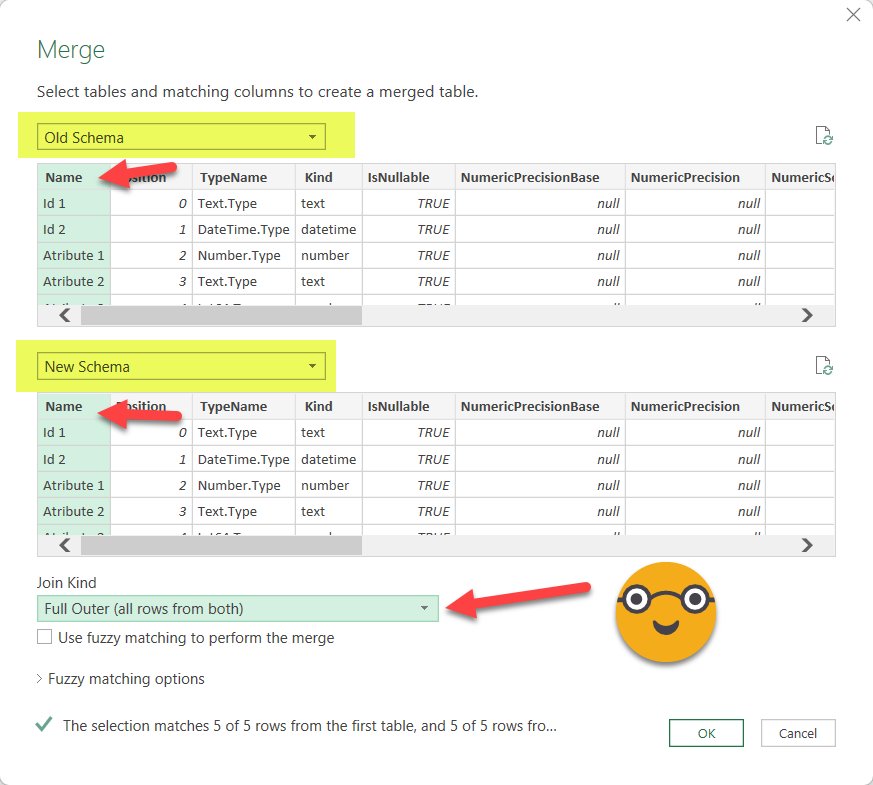
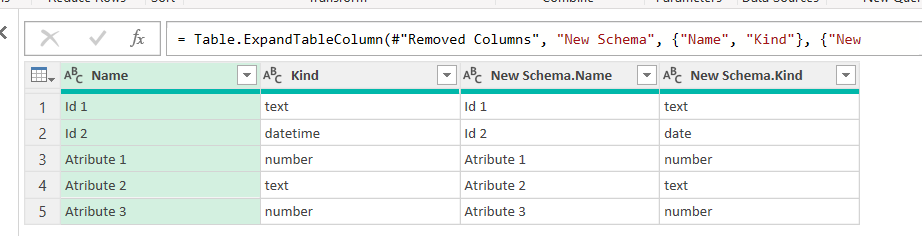
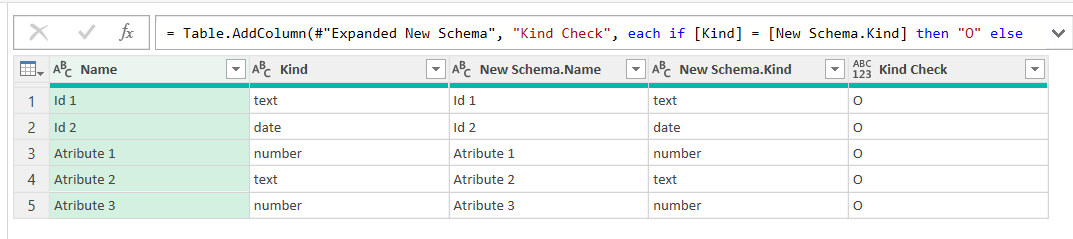
Expand the columns and leave only the ones you need. If you are working with relational databases you might want to make sure that all the small details about the data type is right. Otherwise making sure that the field exists and is the same «Kind» is enough. From our example (well I did a little thing to get things a bit more tricky) we get something like this
If one of the names did not match (Atribute 1 did not have the space for instance) we would se something like:
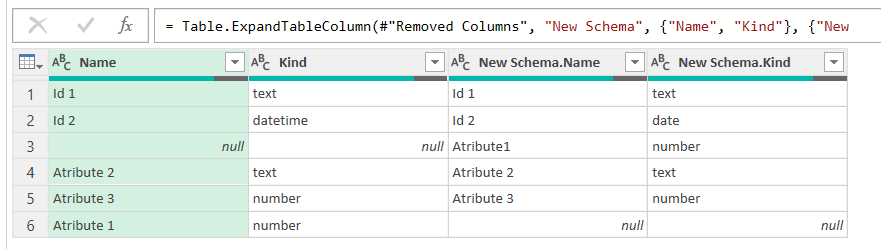
since we did Full Outer merge is easy to see what needs to be fixed. Also you might find fields that are just missing in the new table. You can reference this query and filter the New Schema.Name = null and pass the list of fields to the developer (or yourself) to fix the migrated table. Anyway, you might get all the fields right, but then you sill need to check for the kind of data you have. It should be the same, at least during the validation phase. Later do whatever you see fit.
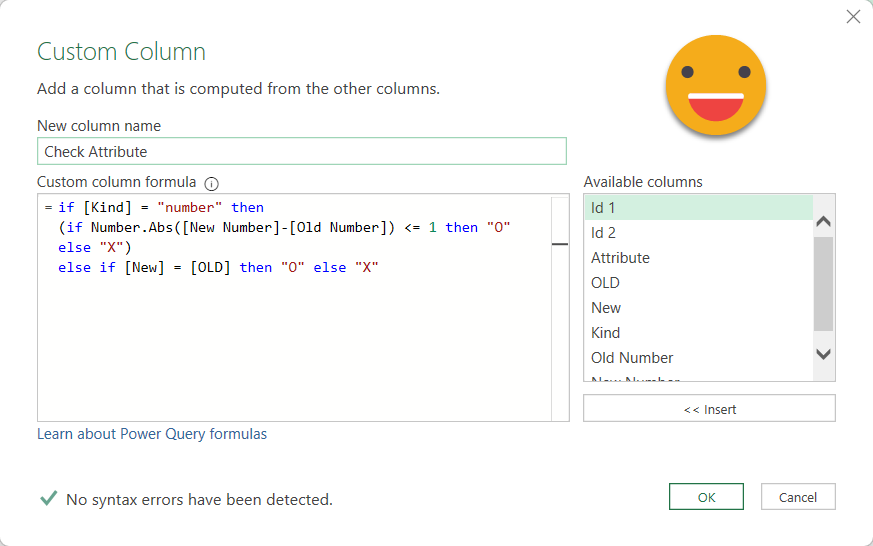
It sounds lazy, but to check if Kind and New Schema.Kind are the same, the best is to make a custom column like:
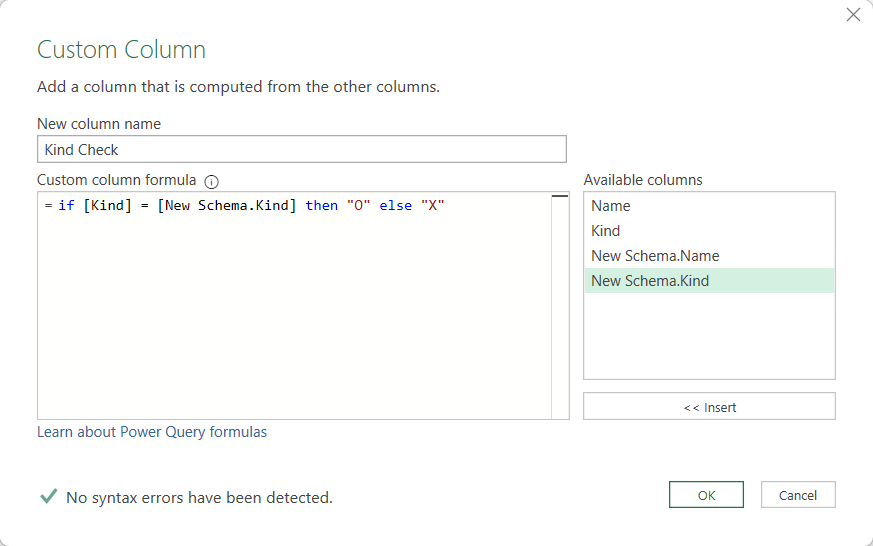
This style of «O» equals OK and «X» is not ok is a very japanese thing that I use sometimes. It’s quite compact and clear, don’t you think?
Anyway, needless to say, if all is good, no «X» should show.

So we have a Date vs Datetime! Oh well — this could be just how power query picks things, or could be a real problem from the source. It it’s just a power query thing, we can just fix it in the query so that it all matches before we start comparing data. Actually it was me who forced the date type instead of datetime, so fixing it is no issue.
Once we have it all aligned and nice, we can proceed.
4. Append your data
To compare the data will bring all the data together. Of course though we still need to know where the data is coming from so before the append we’ll go to the New and Old queries and add a custom column called «SOURCE» (or something similar that is not used in your table) and as value we put «OLD» for the Old query and «NEW» for the New query. Or something along these lines.
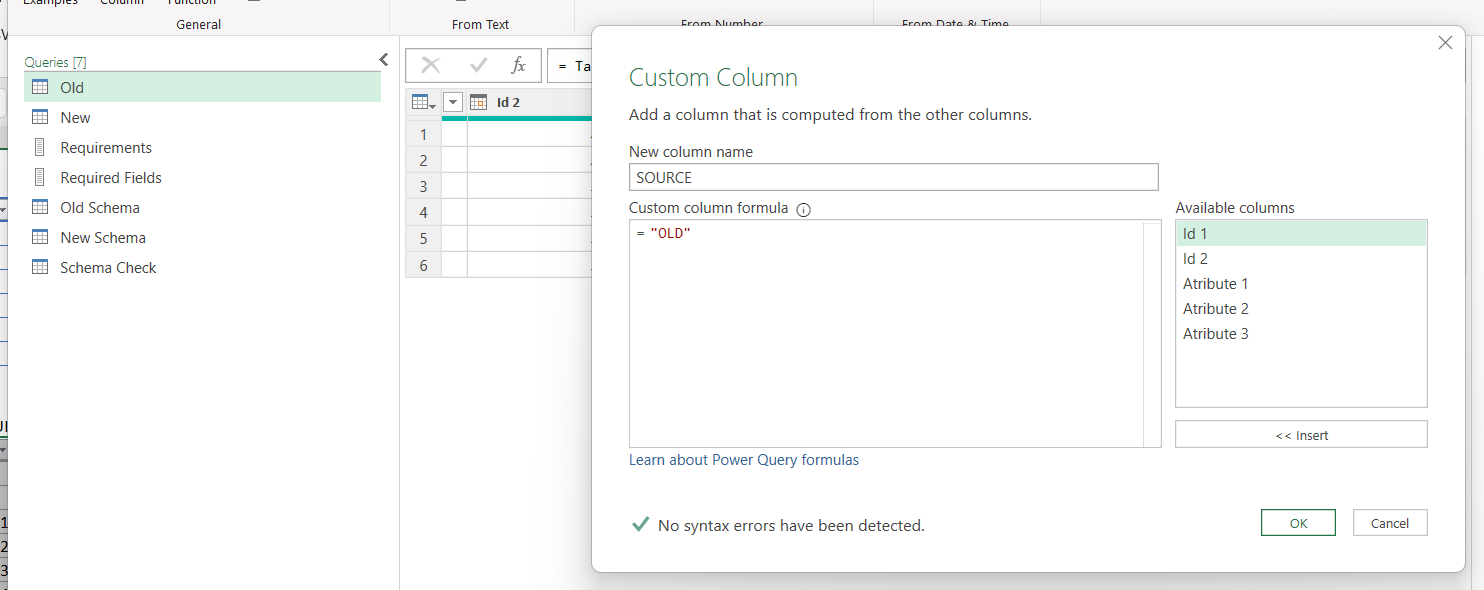
Do the same for the New query (and use the EXACT same column name!). Give both columns Text type if you want to go the safe way.
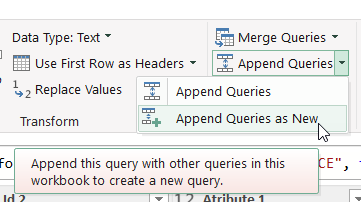
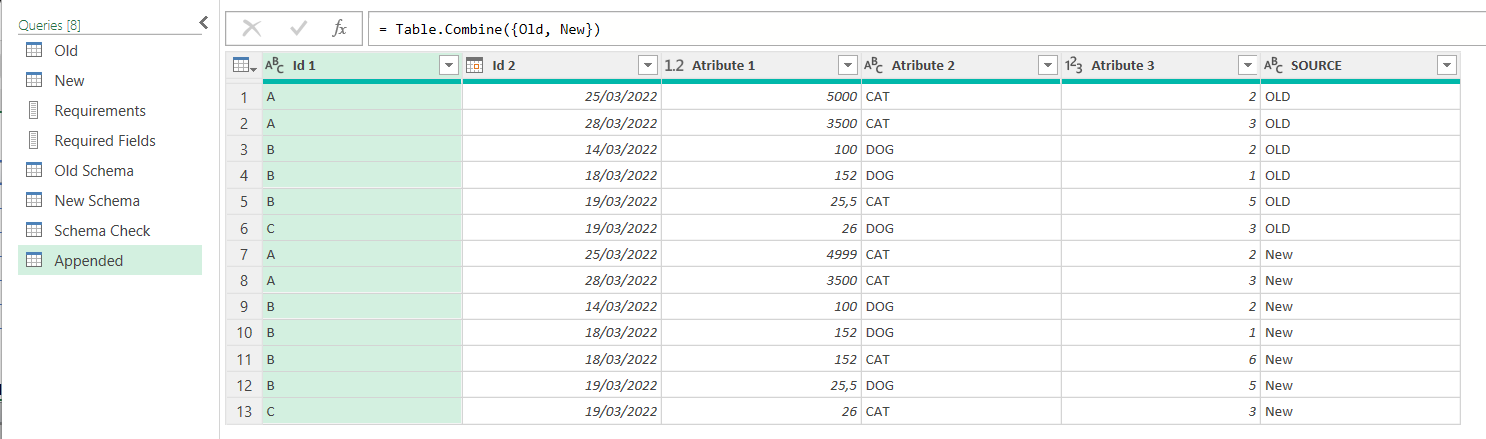
Now it’s time for the actual append. Select the Old query, and select Append –> Append as New
We can rename it something like «Appended» and should look like this (but probably much larger)
5. Check Ids
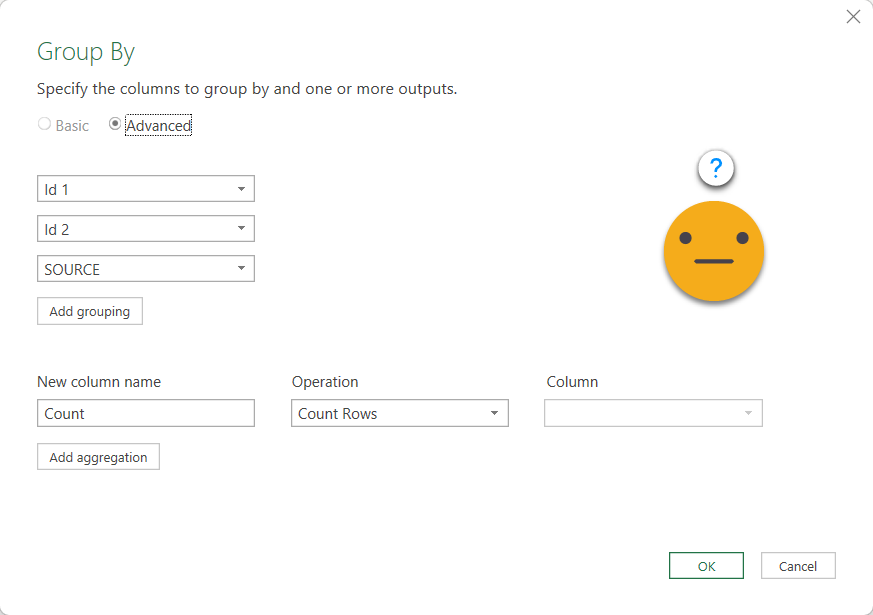
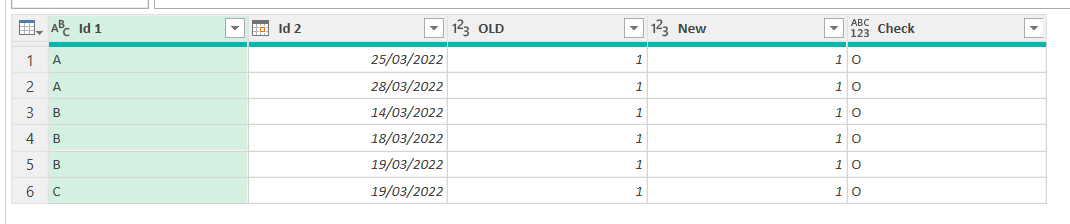
At this point it is necessary to know what fields compound the Primary Key of the table. And actually even if your table does not have a primary key this step might make sense. First of all make a reference of the Appended query and call it «Check IDs». Select the fields that compound the primary key ( if there’s none just select all the categoric fields) and select as well the «Source» column.
In the example we’ll select ID 1, ID 2 and SOURCE. Now we go to Transform Columns tab –> Group By and leave the settings as they are, which will generate a count rows field as aggregation, which is exactly what we want to do. At this point it might not be quite clear what we want to achieve, but you’ll see it in a sec.
Now we have something a bit more manageable like this
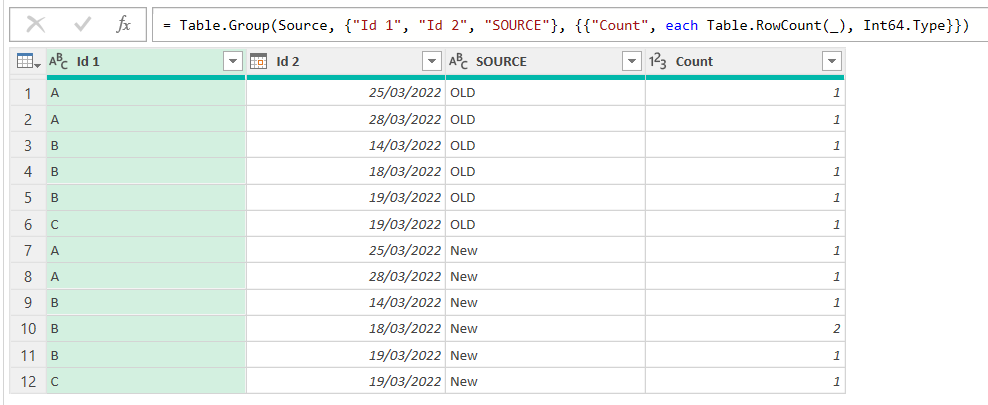
And now the magic is pivoting the source column! Select the SOURCE column and go to Transform Column –> Pivot Column. Then select Count column as the column to use for the values. Sum aggregation is fine, but since we already did a group by the other fields, we could just use «Don’t aggregate» without any problem. We’ll use that option later.

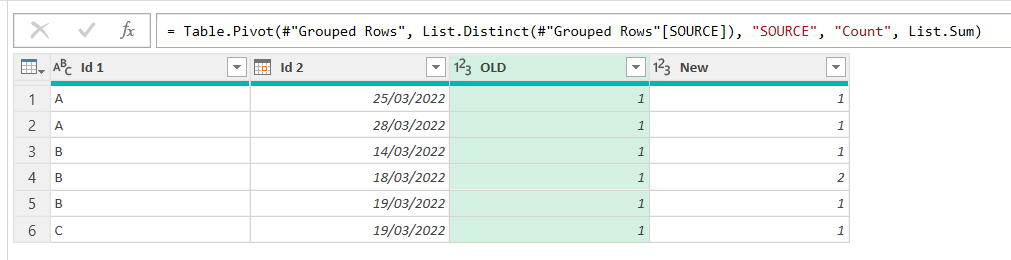
And voilà, we get a first analysis on which Id’s are showing in each table and which are not. And those that do show, how many rows they contain. If indeed it was supposed to be a primary key then anything other than 1 is an issue, but if you don’t have primary key this technique will help you verify that at least from a row perspective you are going in the right direction, or more importantly if you are not, where should you focus.
Here is what we get form the example as it is
Here we see already that there’s a rowcount that does not match, but for the sake of completeness let’s imagine for a sec that our data was a bit messier. Then we would see something like this.

At this point you might want to have a general overview on how bad the problem is. The best way is to create a custom column categorizing each row. Something like
if [OLD] = null then "New Only"
else if [New] = null then "Old Only"
else if [OLD] = [New] then "O"
else "X"
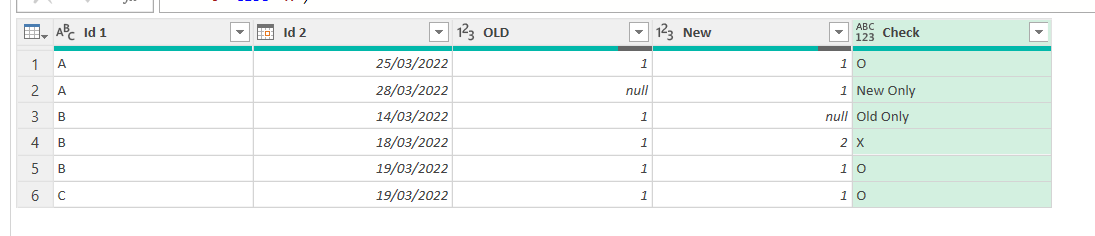
From here it’s straight forward to build a pivot table, show ids of one type, check out what might be going on, and so well, fix it. In our case we saw that the Primary Key was not being respected for B – 19/03/2022 so we found the issue and got rid of the 4th row of our table (improving our query or whatevere produces that table).
The main take away here is that before you start checking attributes you need to make sure you are geting the ids correctly.
So before you continue you should get all «O»‘s on the check column. Like we did
Note: since we are dealing with a tiny amount of data we can check things without leaving the power query editor. For a real life use case you’ll need to load the data into the sheet and make sure that you don’t get any X or missing id in either side. Any «Only in New» is an id that should not make it to the table, since we need to replicate whatever the old process did. But even if we somehow accept that the new table will have more rows than the old one and we just want to make sure that those that match have the same values, we need to make sure that we don’t get any value over 1 if we are supposed to have primary key by one or more fields combined.
6. Check Attributes
Finally we are getting to the attribute part which might be like 90% of the table. It ressembles what we just did but with a twist. Literally.
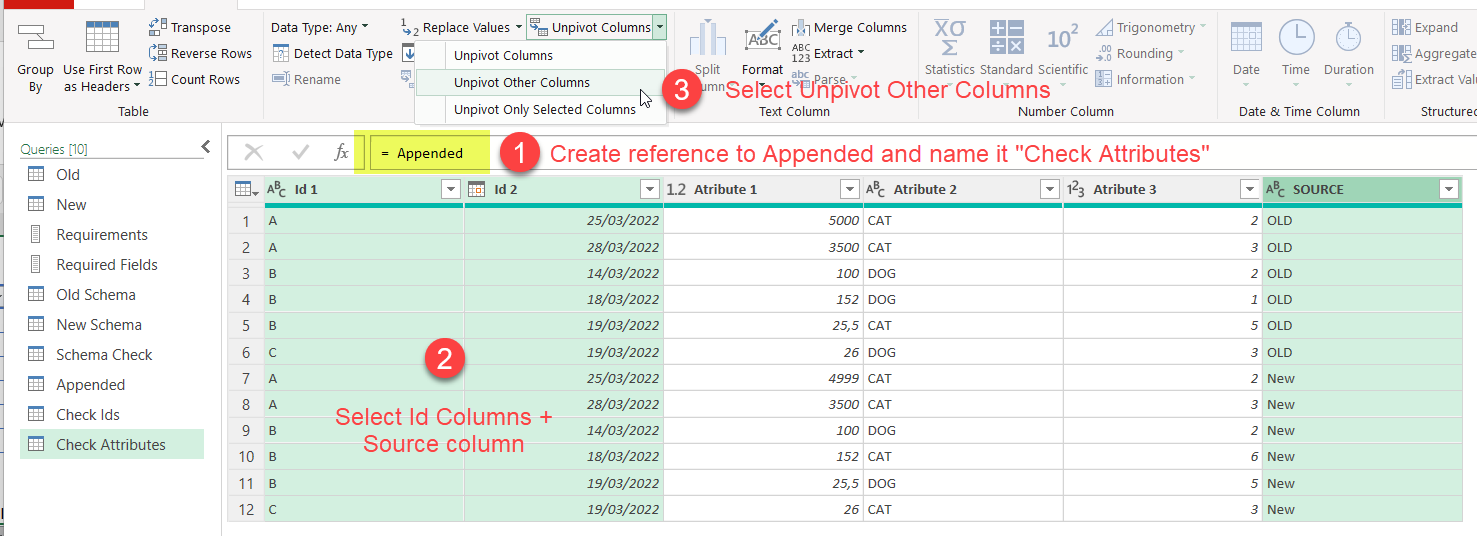
First of all (1) create a new query using Reference on the Appended query like we did when we created Check Ids query. Call this one Check Attributes or so. Now (2) select all the Id columns plus the Source column and (3) click on Transform –> Unpivot Other Columns (or like Power Query says in Spanish, «disable the dynamization of the column» <– true story)
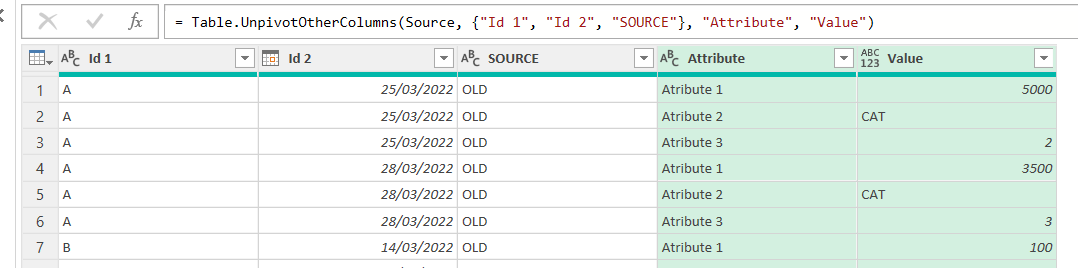
The result should look like this
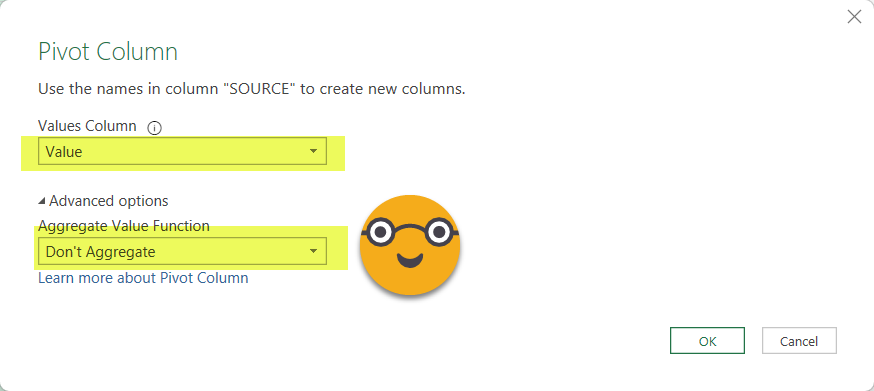
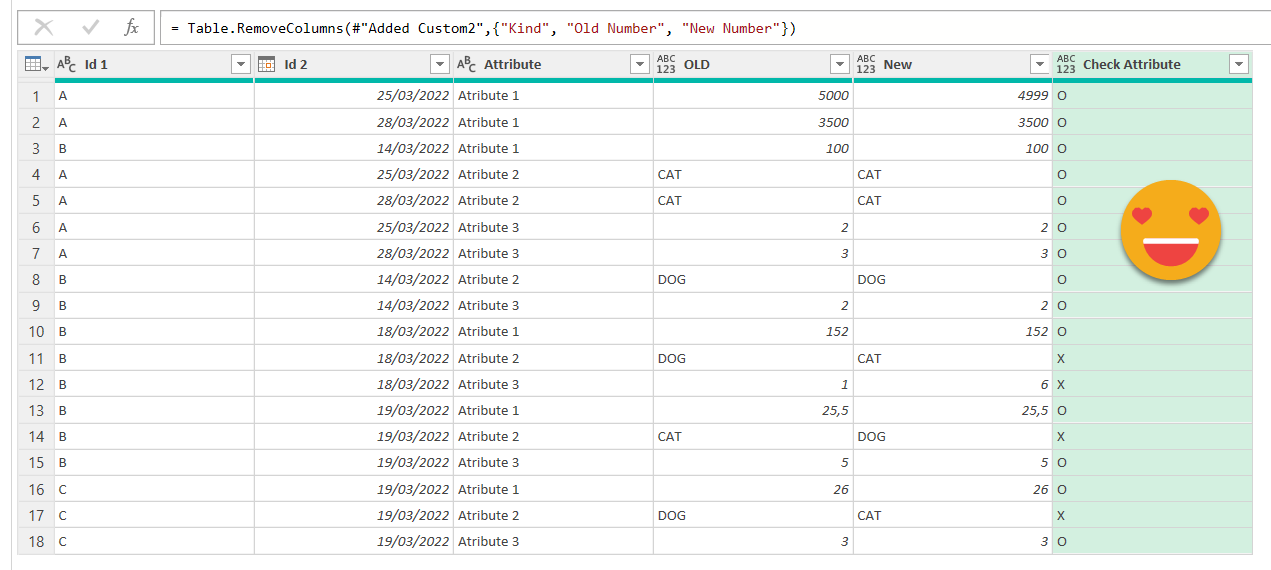
And now once again we’ll pivot the SOURCE column using the Value to inform the new columns, and this time selecting «Do not Aggregate». Since we already checked that the primary key is respected in both tables, we will not get any errors doing it.
And voilà, we get something already very interesting

From here is already downhill. If your data needs to match perfectly and nothing odd happens when reading from either source so numbers show the same (no extra decimal positions or so) you can just compare straight away like we did with the column kind or the row count.
if [OLD] = [New] then "O" else "X"
Here its better if we do not have nulls. If you have nulls in your data is better replace them by something as it makes comparisons easier. For instance, if like we said we may have more rows on the new table (And that’s accepted) we want to separate between the nulls due to no correspondence between old and new tables from the nulls present in our data. The place to replace them is in the Appended query. If you make sure you have no nulls there, then when you reach this point you can just filer out the nulls in the Old column and take it from there.
If you need to accept little differences between numbers, due to acknowledged differences in rounding, say, it might get a bit messy, so we’ll do one more trick and finish here.
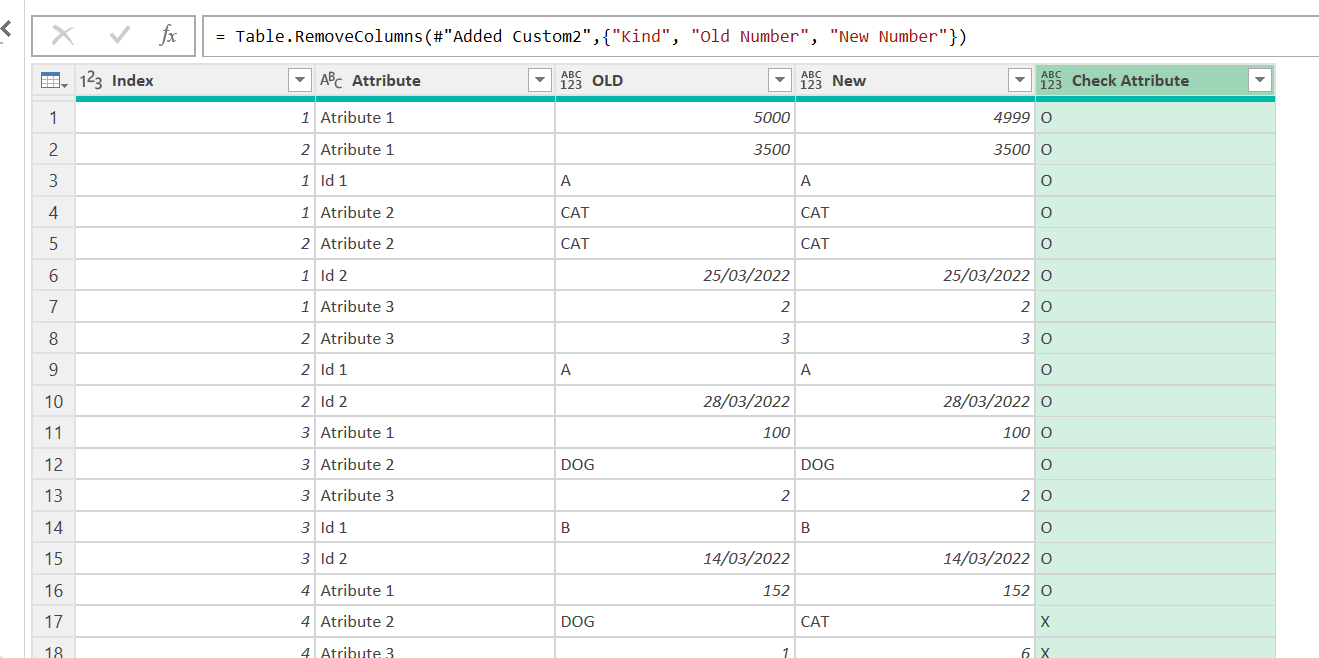
To know if you are dealing with a number attribute or else, we can just join with the schema query and get the Kind column. Then we can create a column that only contains the values for the number attributes and we can set a number type on that column without causing any errors. And finally our check column can read from the number columns when checking numbers and from the reguar columns when checking the rest. While it looks we are pivoting again, it’s ok. After all I’ve only found myself doing it for numbers.
The logic of the check column could be something like
After this we can remove the number columns and the Kind column, and get something like this
And if we load that to a pivot table it’s straignt forward to have a general view on which attributes need more attention and getting the details of the cases that do not match
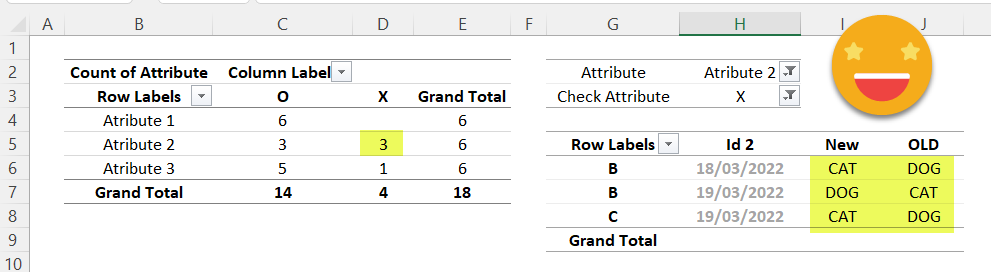
And the best part of it? That when you see the values you get the idea of where it’s wrong so you go, you fix it, come back and REFRESH! Rinse and repeat until the X column disappears!
I’ve done that on tables that were already «OK» and found more than you would believe. Validation is not a joke. You don’t want the business side to find each and every little thing on their reports, because everyone knows that business tests things when they really have to use it. If it’s something you can check, check it. Don’t wait for the buisness side to tell you that where it said DOG now says CAT. You should already know that. Also, do your full validation for quite a few days, even once it goes into production. If you find the issues before business does, you can keep trust in data high.
7. Bonus track — how do I check attibute values if I don’t have a Primary Key?
Yes, sometimes you have to validate tables that do not have primary key. It’s a terrible idea to have a table without primary key, but hey, we do not call all the shots right? Anyway, the approach for Id Check can go a long way into validating specific fields as well. Instead of a Row Count you can replace that with a SUM (or Max or Min or whatever) from your most critical field and move from there. But when you have all the biggies sorted out you still need to make sure you have all the rows and all the rows have all the right values. What is to be done? Sort. Sort things the same way and first row should match the first row and so on.
It can be done in several ways, so this is one possibility.
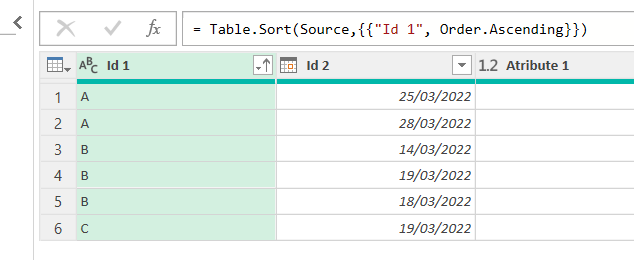
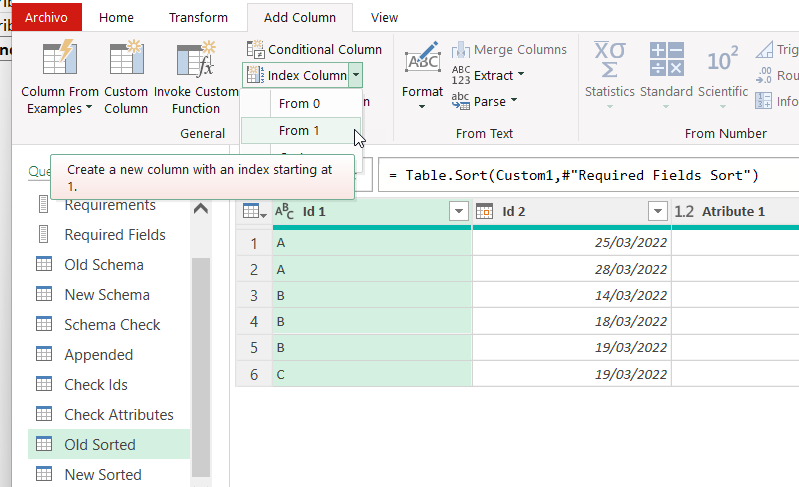
Create a reference to the New query and another one to the Old query (call them New Sorted and Old Sorted). Like we did before, we need to figure out how to set up a dynamic sort by all columns in the same order they appear. So first we’ll do a sort by one column and see the formula that comes out. Looks like this
So, the second argument is a list of 2-item lists, where the first one is the header name and the second one is Order.Ascending. Since we already have a list of the required field names, we’ll make a reference to that list and call it Required Fields Sort. We need to transform each item on that list in a 2 item list, where the first item is the original item and the second one is the Order.Ascending thing.
We can just modify the source step of our Required Fields sort query and type
= List.Transform( #"Required Fields", each { _ , Order.Ascending})
List Transform will, er, transform a list, and when we use each in the second argument we can transform each item. To refer to the original item we use the underscore thing _. So we just build a list that contains the original item and the second argument which is Order.Ascending. I was affraid that this would throw out an error or something, but turns out it’s just a constant of value 0. Clicking on the cell of any items of the list we see that indeed each contains the header name and the constant
So now it’s time to feed it into the sort function. Replace the second argument (all of it) by the Required Fields Sort query.
= Table.Sort(Source,{{"Id 1", Order.Ascending}})
= Table.Sort(Source,#"Required Fields Sort")
And that’s it! you sorted it. But not too fast, I just remembered that you need to buffer the table before doin a sort (it’s a power query thing). So go back to the source step of the Old Sorted (and New Sorted of course), insert a custom step (like we’ve done a couple times already) and modify the function to
= Table.Buffer(Source)
Ok, so we buffer first, then we sort, now we need to number the rows to be able to tie row 1 with row 1 and so on. So we add an Index column starting by 1 (or by 0, but use the same criteria on both queries!)
Once you do this, the index column is your primary key. So you follow the same steps we did with the Attribute value check, but select the index column and the source column, then unpivot the rest, then pivot the source column and you’ll get the value of each attribute (well of any field indeed) for row 1 row 2 row 3 etc for both old and new queries. Important to do this validation at the very end, since any row that is on one query but not the other will cause all subsequent row checks to fail. So this one is to be extra sure that all is fine. Needless to say, if you do not have a primary key you can only validate if you have the same number of rows in both tables. Anyway, once you add the validation columns it should look something like this.
Now as I was finishin gthis long article I realized that this approach allows to compare more that two tables as well, although I haven’t found that use case for real so far. Once you append them on top of each other, all the steps are the same. For the logic check column it might get a bit more sophisticated because there are more possible outcomes.
6. The end
thank you for reading! Remember the whole point is building it and then keep refreshing every time you do some promising modification in your process so that you can obtain the same result as the old process. That sometimes means doing things «wrong» but getting the same result once will allow to set a base line and from there implement the modifications required and discovered through the migration.
You want the file? Sure. Here it is
Once you start using a solution like this it will become part of your workflow, trust me! Thank you for reading and take care!