Hello hello, before the topic cools down, let’s complete what we started the other day. As a quick recap we built a Power Automate flow that will launch refreshes of Power BI datasets only when certain ETL jobs of the server have successfully completed. And not only that, those datasets that read from certain high-demand databases will be limited to a certain number of simultaneous refreshes. If you haven’t read it, go and do it. In this article I want to share how I built the PowerApp to manage the ‘Datasets table’ and the ‘Preceeding jobs table’ we discussed on Part 1 of this series. I’m no expert in PowerApps. What I’ll share is what I’ve learned very recently by googling, asking around and tons of trial and error. If there are better ways of doing it, please let me know! with this out of the way, let’s get started!
The first version of the app, while it worked, was so poor that I’ll just skip it, and we’ll jump right into the current one which even though is not yet in production, I am confident that has a much better foundation and user experience. Let’s just say that in the first version, copying GUIDs was a thing.
The data for the app
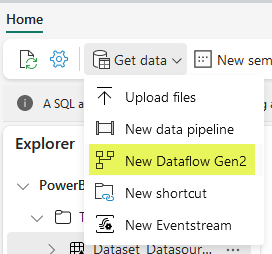
This app is to configure dataset refreshes. So at the very least we will need a list of the datasets and the workspace where they are. And we will need the name and the id for both. To get that is not super easy, or at least it was not for me. If you are good with APIs and PowerAutomate, most likely you can put it together so that the app calls the PowerAutomte, or something like this. I chose a different route since I already have a quite comprehensive metadata extraction setup (based on the wonderful series of articles of Just Blindbæk). For reporting in Power BI I already had setup several dataflows reading from the blob storage and massaging all those massive JSON files. I have two versions, one that creates sort of a slow changing dimension to build a dataset dimension that will work with the full activity log files (datasets come and go) and one that just loads the current datasets (I say datasets, but I have one for dataflows, reports, workspaces, etc). So I wanted to use in PowerApps the current datasets table that I already had on my Dataflow Gen 1. Is that possible?
At first I resisted, but at the end I went through and it worked. What I did is a bit crazy. Using the fabric trial that we still have, I set up a fabric workspace. Then I created a PBI Metadata lakehouse! (this is new to me too, don’t worry). Then I said I wanted to load it with a Dataflow Gen 2, and yes, I just went to dataflow gen 1 and selected all queries, copied them with CTRL+C and went to the dataflow gen 2 and pasted them with CTRL+V and it works!! bananas. It even kept by query folders and all.
Pro tip: When working with Dataflows Gen2 and Lakehouses, make sure your columns do not have spaces, or else the mapping with the columns of the Lakehouse table will fail if you have to modify the destination configuration (or check if it’s all ok). This might be fixed in the future, but that’s how it is today. Anyway, you can add a step at the end of each table that goes like:
= Table.TransformColumnNames(PreviousStep,each Text.Replace(_," ","_"))
But wait, we just have the data in the Lakehouse, how do we get them to PowerApps you say? THROUGH THE SQL ENDPONT! that’s how!
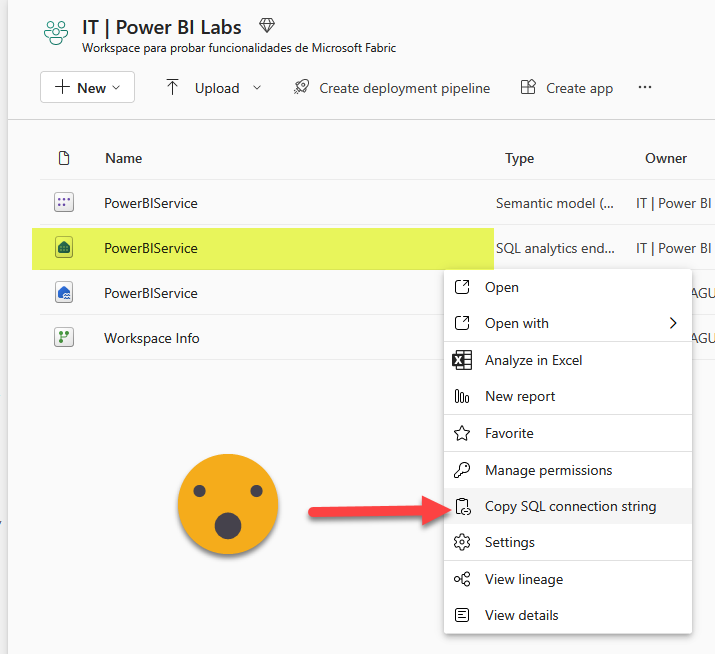
And in PowerApps we go to Data, new datasource and from there we say it’s a SQL Server with Azure AD integrated authentication. The superlong string that is given as the «SQL connection string» (aka SQL Endpoint) is what you need to provide as «Server» and the Lakehouse name is your «Database». Once you do that you will see you can choose any of the tables or views of your Lakehouse. It can take a very long while to show up in your datasource list. Be patient.
Yes. It works. Let’s call this table «All Datasets» to distinguish from the regular «Datasets» which contains the configured datasets. It contains a lot of other information but we’re interested just in Workspace_Name, Workspace_Id, Dataset_Name, Dataset_Id.
Two other tables are quite easy. We will need the ‘Datasets‘ and ‘Preceding jobs‘ that we described in the first part of this series.
The final table we did not discuss it in the first part, but is also a table that any warehouse should have, a table with the last execution of all the jobs. Let’s call it the ‘Jobs‘ table. It may have information about the latest run of the job (unlike the «Executions» which has all of them) but for the app, we’ll just use it as a list of possible jobs. As a matter of fact, when we register the refreshes on the warehouse, we should also do it on this table. If it’s the first time, insert a new row, if it’s not just update the existing one for the dataset.
The PowerAutomate flows for the app
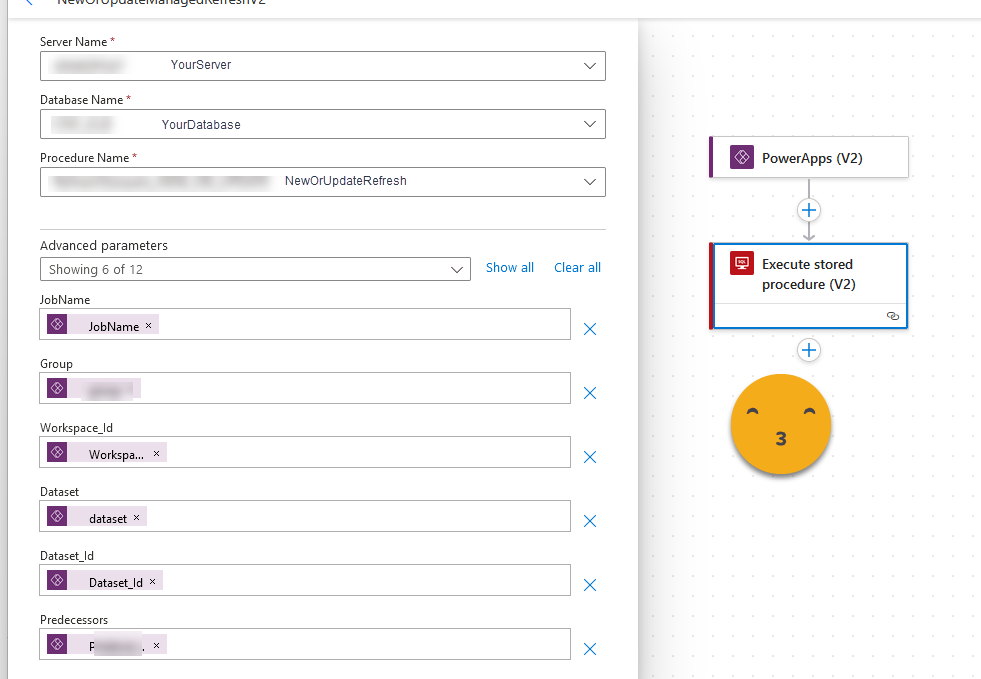
Before we jump into the actual app we need to talk about the actions that the app will perform on the tables ‘Datasets‘ and ‘Preceding jobs‘. Basically we need to create, delete and modify records as usual. We cannot modify directly the database from power apps, we need to do it through a PowerAutomate flow. And even then, we cannot do it directly, we need to do it with Stored Procedures. What I did was to create 3 different stored procedures, and a Power automate flow for each of those procedures.
- Delete refresh
- Restore refresh
- New or modify refresh
CREATE OR ALTER PROCEDURE [pbi].[DeleteRefresh]

	@JobName NVARCHAR(250)
	AS
BEGIN
	SET NOCOUNT ON;

	UPDATE D
	SET RemoveDate = GETDATE()
	FROM pbi.Datasets D
	WHERE D.job_name = @JobName
END
GO
CREATE OR ALTER PROCEDURE [pbi].[RestoreRefresh]

	@JobName NVARCHAR(250)
	AS
BEGIN
	SET NOCOUNT ON;

	UPDATE D
	SET RemoveDate = NULL
	FROM pbi.Datasets D
	WHERE D.job_name = @JobName
END
GO
CREATE OR ALTER   PROCEDURE [pbi].[NewOrModifyRefresh]
	@JobName NVARCHAR(250),
	@Workspace_Name NVARCHAR(250),
	@Workspace_Id NVARCHAR(250),
	@Dataset_Name NVARCHAR(250),
	@Dataset_Id NVARCHAR(250),
	@PredeceedingJobs NVARCHAR(800),
	@DatasetOrDataflow NVARCHAR(250),
	@Weekday NVARCHAR(100),
	@Monthday NVARCHAR(100),
	@Priority
	AS
BEGIN
	/*predecessors are job_name of previous procedures split by "|" */
	SET NOCOUNT ON;
	DECLARE @maxID AS INT
	DECLARE @link AS NVARCHAR(500)
	DECLARE @RefreshId NVARCHAR(250)
	IF (SELECT COUNT(*) FROM pbi.Datasets WHERE job_name = @JobName) = 0
		--insert new row with new id
		BEGIN
			SET @maxID = (SELECT MAX(refreshID) from pbi.Datasets)
			SET @RefreshId = @maxId + 1
			INSERT INTO pbi.Datasets
			([job name]
			  ,[workspace name]
			  ,[workspace id]
			  ,[dataset name]
			  ,[dataset id]
			  ,[refresh id]
			  ,[dataset or dataflow]
			  ,[monthDays]
			  ,[weekdays])
			SELECT [job name] = @JobName
			  ,[workspace name] = @Workspace_Name
			  ,[workspace id] = @Workspace_Id
			  ,[dataset name] = @Dataset_Name
			  ,[dataset id] = @Dataset_Id
			  ,[refresh id] = @RefreshId
			  ,[dataset or dataflow] = @datasetOrDataflow
			  ,[MonthDays] = @Monthday
			  ,[WeekDays] = @Weekday

			--insert preceding jobs into the preceding jobs table
			INSERT INTO pbi.[Preceding jobs] ([Refresh Id],[preceding job name])
			SELECT @RefreshId as "RefreshId",
				Value as "preceding job name"
			FROM string_split(@PredeceedingJobs , '|')
		END
	ELSE
		--Update existing row
		BEGIN
			SET @RefreshId = (SELECT refreshID FROM pbi.RefreshDatasets WHERE job_name = @JobName)
			UPDATE D
			SET [job name] = @JobName
			  ,[workspace name] = @Workspace_Name
			  ,[workspace id] = @Workspace_Id
			  ,[dataset name] = @Dataset_Name
			  ,[dataset id] = @Dataset_Id
			  /*,[refresh id] = @RefreshId NEVER UPDATE THIS ONE!*/
			  ,[dataset or dataflow] = @datasetOrDataflow
			  ,[MonthDays] = @Monthday
			  ,[WeekDays] = @Weekday

			FROM pbi.Datasets D
			WHERE [job name] = @JobName

			--remove existing rows for preceeding jobs...
			DELETE  PJ
			FROM pbi.[Preceeding jobs] PJ
			WHERE PJ.[refresh id] = @RefreshId

			--... and insert them again
			INSERT INTO pbi.[Preceding jobs] ([Refresh Id],[preceding job name])
			SELECT @RefreshId as "RefreshId",
				Value as "preceding job name"
			FROM string_split(@PredeceedingJobs , '|')
		END
END
GO
The three stored procedures are not SQL masterpieces but get the job done. The only interesting bit is how to handle the preceding jobs. What I do is to pass them all as a single parameter spliting by «|» and with this «string_split» function I create again a table on the fly which I can use to insert rows into the preceding job table. I wanted to minimize the number of stored procedures so I combined the creation and update procedures into one.
Important! to modify a production table, chances are you will be using a specific user created for the automation purposes and with very limited permissions. This user must have execution permission of these 3 stored procedures! You probably need to put it in a separate JIRA ticket just so that they do not forget about it.
The PowerAutomate flows are really basic. As trigger we put PowerApps (V2) component. That allows us to define how many parameter we will need to pass and which values will they take. This has the advantage that while typing the formula you will at least know what’s the name of the parameter, which is nice.
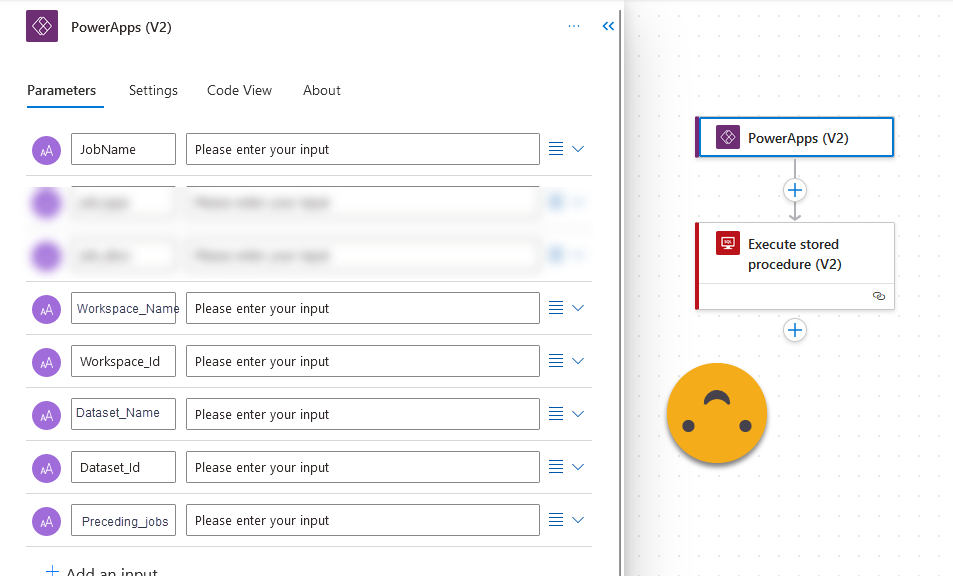
The actual call to the stored procedure is a piece of cake
The flows for Delete and restore are exactly the same but with just one parameter, the job name.
The structure of the App
Now that we defined the data that we’ll be using and the actions to interact with the server, let’s see how the actual app will be built:
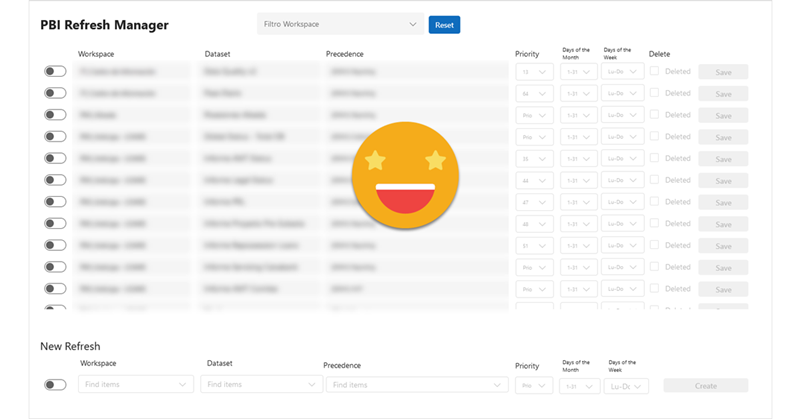
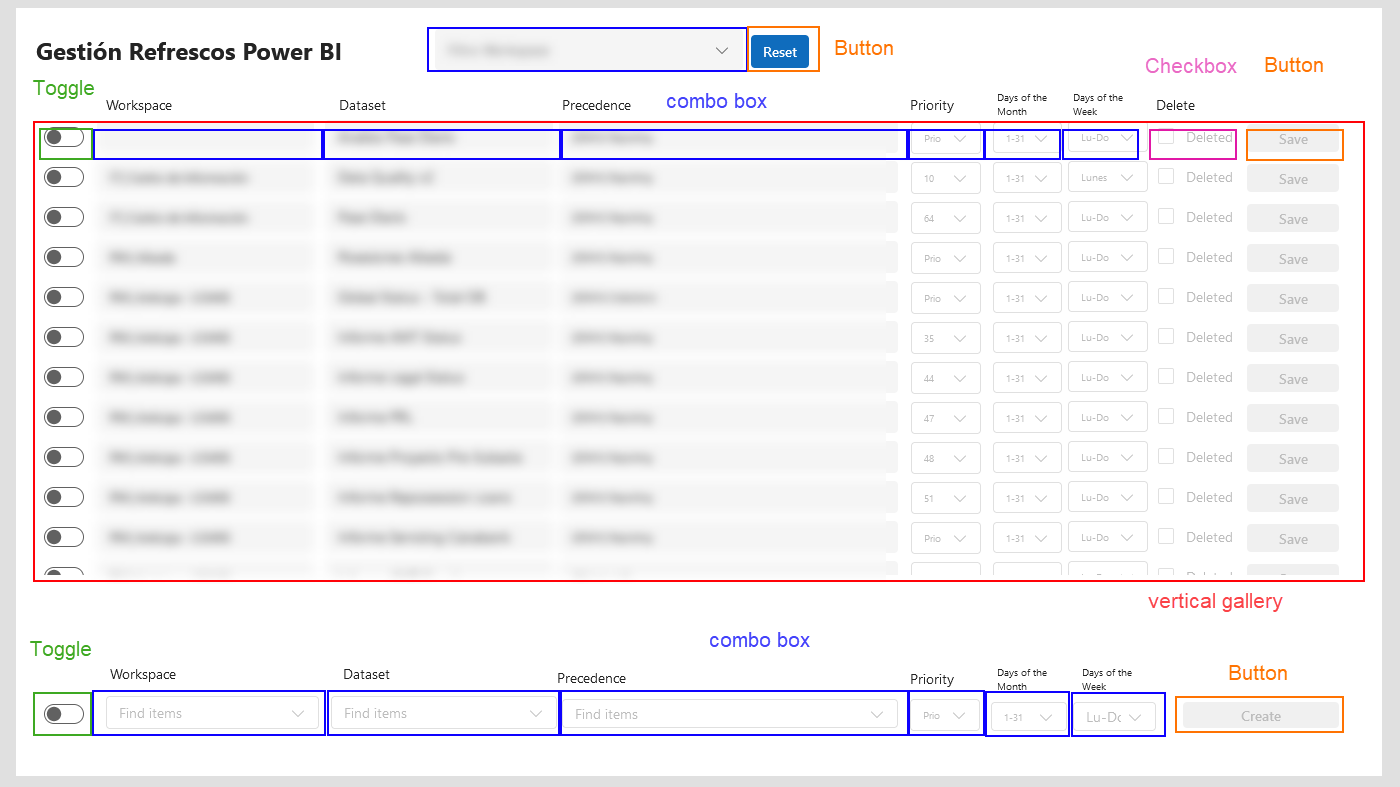
The app is quite easy, with a single screen.
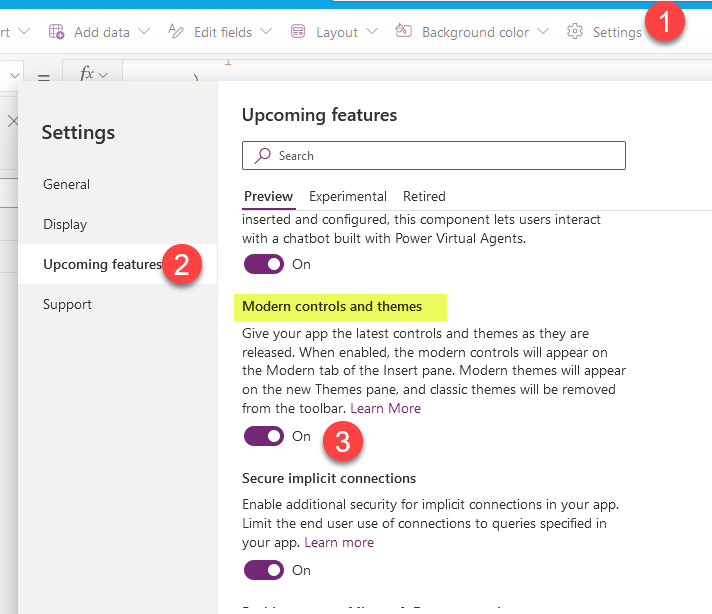
We’ll go control by control explaining the properties that need to be set up so you can understand how they interact with each other. I’ll be using the «modern» controls which look much better. You need to turn them on first by going to Settings > Upcoming features > Modern controls and themes
The top filter (cmbWorkspaceSearch)
This filter is a workspace filter, that will allow us to focus on the datasets of a single workspace, which is nice. However, since will this will filter the configured datasets there’s no need to pick the full list of workspaces of Power BI Service (the All Datasets table described earlier). It’s enough to pick the different workspaces of «Datasets» table, the datasets that have a refresh configured on the table.
Let’s dive into the «Items» property of this combo box. And welcome to the PowerFx language… a beast of its own.
SortByColumns(
    AddColumns(
        RenameColumns(
            Distinct(
                'pbi.RefreshDatasets',
                Workspace_Name
            ),
            "Value",
            "Workspace_Name"
        ),
        "Is New",
        If(
            IsBlank(Find("|",Workspace_Name)),
            0,
            1
        )
    ),
    "Is New",
    SortOrder.Descending,
    "Workspace_Name",
    SortOrder.Ascending
)
In this language is almost impossible to know if you need to use single quotes, double quotes or no quotes at all. Also, in some cases header name might disappear as when you use «Distinct» which makes the resulting column be named «Value». But you can use RenameColumns, and then add columns if you want to use them for sorting. In this case I wanted the workspaces containing a pipe «|» to be shown first, as is it signals the workspace naming convention to where we are trying to transition, but of course here you can do as you please (as in the rest of your life in general).
Normally googling the name of the function with powerapps it will land you on the correct spot. Is a bit better than PowerAutomate expressions, although that’s a very low bar.
There is a Sort and a SortByColumns function. To sort by more than one column you need to use the latter.
The reset button (btnReset)
The reset button is the only reliable way I found to clear the selection of the Top Filter combobox. It only contains some code in the OnSelect property that is just:
Reset(cmbWorkspaceSearch)
The Vertical Gallery (gllRefreshes)
The vertical gallery is quite important as is the one showing all the different datasets. The important thing here is that the order matters. Since we are using soft deletes, it means that deleted datasets stay around forever. Also as I mentioned in the previous control I want the datasets in workspaces containing «|» in the name to show first, but after that I need to show first the non-deleted rows, and then be alphabetically sorted by workspace name and dataset name. And yet one more thing. If I have anything selected in the Top Filter I want to show only datasets on that workspace. If I don’t have anything selected I want to show them all. That makes the formula a bit longer, but surprisingly it works fine.
Items property:
SortByColumns(
    AddColumns(
        If(
            IsEmpty(cmbWorkspaceSearch.SelectedItems),
            'pbi.Datasets',
            Filter(
                'pbi.Datasets',
                'Workspace Id' = LookUp(
                    Workspace_Datasets,
                    Workspace_Name = First(cmbWorkspaceSearch.SelectedItems).Workspace_Name,
                    Workspace_Id
                )
            )
        ),
        "Is New",
        If(
            IsBlank(Find("|",Workspace_Name)),
            0,
            1
        ),
        "Is Deleted",
        If(
            IsBlank(RemoveDate),
            0,
            1
        )
    ),
    "Is Deleted",
    SortOrder.Ascending,
    "Is New",
    SortOrder.Descending,
    "Workspace_Name",
    SortOrder.Ascending,
    "Dataset_Name",
    SortOrder.Ascending
)
As you can see I filter by the workspace ID and not the workspace name, because it’s unlikely but not impossible that the workspace name may have changed at some point.
Note: When building the app I experienced that when changing the order in which datasets are displayed it would mess the comboboxes to the point in which they would nor display the desired values or items. Probably is just a glitch, but make sure that you have this properly setup before you proceed with the rest of controls. Just in case.
The Toggle (tglEdit)
This control is just to enable the dropdowns etc of a single row to avoid clicking where you don’t want to click and changing what you don’t want to change. It makes the dataset you are editing stand from the rest, which I figured out it would be nice.
The Delete Checkbox (chkDelete)
This control is towards the right but we’ll discuss it first as I use it in some expressions in following controls.
Checked property:
Not(IsBlank(ThisItem.RemoveDate))
Basically the checkbox will be checked if the dataset of the row has a remove date in the «Datasets» table.
This checkbox is connected with two of the stored procedures.
OnCheck property:
DeleteManagedRefresh.Run(ThisItem.job_name);
Refresh('pbi.Datasets')
See that these are two actions separated by a semicolon. First we modify the database by calling the PowerAutomate flow (using the job name as parameter), then we refresh the data of the table in the app to reflect the change.
OnUncheck property is almost the same:
RestoreManagedRefresh.Run(ThisItem.job_name);
Refresh('pbi.Datasets')
Since the gallery is sorted to have those deleted on the bottom when you delete a dataset it looks like it disappears, but it actually just moves to the bottom part of the gallery with all the other deleted datasets. I would like to add some confirmation window, but so far that’s how it goes.
In part for that I thought it would be good to keep it only enabled if the user is actively modifying the dataset. So I configured the «DisplayMode» property
If(
    tglEdit.Checked,
    DisplayMode.Edit,
    DisplayMode.Disabled
)
This way if the toggle is not ON, you can’t accidently soft-delete a refresh dataset.
The Workspace Combobox (cmbWorkspace)
The combo box itself might look like the Top Filter one, but its contents are different. Since here we are configuring a dataset, we might now want to change it to a workspace where we don’t have yet any configured dataset, meaning we cannot get the workspace from the «Datasets» table. We need to use the «All Datasets» table. However, unless you have a pristine table to read from, you might have also the personal workspaces and a even deleted workspaces since all these come out of the API call. In my case the dataflow even has data from two different tenants. Fortunately dataset orchestration only happens in one of the two so I can safely get rid of all the datasets of the other tenant. Still, we want to sort the workspaces with names containing «|» first ant then the rest, and then alphabetically of course. Last but not least we want it to show the current workspace name.
The Items property looks like this:
SortByColumns(
    AddColumns(
        RenameColumns(
            Distinct(
                Filter(
                    Workspace_Datasets,
                    Type <> "Personal"
                        && Tenant = "main"
                        && State <> "Deleted"
                ),
                Workspace_Name
            ),
            "Value",
            "Workspace_Name"
        ),
        "Is New",
        If(
            IsBlank(Find("|",Workspace_Name)),
            0,
            1
        )
    ),
    "Is New",
    SortOrder.Descending,
    "Workspace_Name",
    SortOrder.Ascending
)
Once we set up this properties we can go into the fields and select «Workspace_Name» as the field that will be displayed.
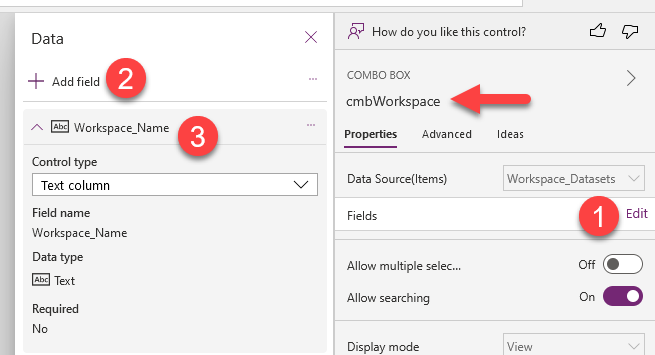
Now we want only a single selection, so the MultiSelect property will be set as false. Yet, since the control can allow multiple selection, the DefaultSelectedItems property, expects an array. That took me a while to figure out. Oh and is quite important that the resulting column name matches the field defie
DefaultSelectedItems property:
[
    First(
        ShowColumns(
            Filter(
                Workspace_Datasets,
                Workspace_Id = ThisItem.'Workspace Id'
            ),
            "Workspace_Name"
        )
    )
]
Again, here we filter by workspace ID and then get the name from the Workspace_Datasets. Notice the square brackets at the beginning and end. This is how you build arrays in PowerFx. By specifying a single column and a First aggregator we will always get a single value. Of course if at some point the workspace id is no longer present in the Power BI service, it will no longer show any name under workspace. But I mean, if it’s gone, it’s gone. If it’s really necessary you still have the old GUID and Name in the ‘Datasets’ table.
Finally for the DisplayMode, I realized that it should be only in edit mode if the toggleEdit is active but also if the dataset is not deleted. If it’s not deleted but is not to be edited either, the View mode is best for readibility. Disabled is like light gray on white.
If(
    chkDeleted.Checked,
    DisplayMode.Disabled,
    If(
        tglEdit.Checked,
        DisplayMode.Edit,
        DisplayMode.View
    )
)
The Dataset Combobox (cmbDataset)
This one is interesting to set up because is conditional on the workspace of the workspace combo box.
The Items property is set up like this:
Filter(
    Workspace_Datasets,
    Workspace_Name = cmbWorkspace.Selected.Workspace_Name
)
This one took me a while to figure out. You can refer to the control of the same line of the callery by its name, but the Selected refers to the whole row of the «Items» table of the control, so you need to add the column name to get a value. At the same time for the items of a combobox you do not need a single column table, you can provide any table (here the one resulting from the Filter function) and then by editing the Fields of the control (like shown before) specify which column should be displayed.
Similar to the Workspace combo box we need to set up the DefaultSelectedItems as single value array
[
    First(
        ShowColumns(
            Filter(
                Workspace_Datasets,
                Dataset_Id = ThisItem.'Dataset Id'
            ),
            "Dataset_Name"
        )
    )
]
Here we use again ShowColumns and First to make sure that we end up with a single value.
DisplayMode is configured exactly the same as in cmbWorkspace
Preceding jobs combobox (cmbPrecedingJobs)
This control is slightly different because it needs multiselection, and datasource is different. Let’s have a look:
Items property takes its values from the jobs table:
Jobs
This is just our jobs table. It just showed up in a reasonable order so I did not change it, but feel free to filter and sort it as you see fit as we did with workspaces and datasets. A nice thing that I did not mention about this combo boxes is that they allow searching so you type and you get only the matching items, and it will remember any that you have already selected. Very convenient.
To be able to select more than one, and in this case we need to do so, we need to configure the SelectMultiple property to true.
Other than that we’ll set up the DisplayMode property exactly the same as in cmbDataset and cmbWorkspace.
Priority (cmbPriority)
This is pretty straightforward. The only new thing here is that we do not get the items from an external data source. Instead we just type in the possible numbers.
The Items property becomes:
[1,2,3,4,5,6,7,8,9,10]
And de DefaultSelectedItems becomes:
[ThisItem.Priority]
Don’t forget the square brackets around the value to make it an array! In this case SelectMultiple must be set to false (the default).
Days of the month (cmbMonthDays)
This combobox allows configuration of the days of the month in which it needs to run the refresh. This is a request that came from the end user after I wrote the part one of this series. We’ll discuss the control and then the modifications required to make it work on the Power Automate flow of part 1.
The Items property I set it up like this:
[1,2,3,4,5,6,7,8,9,10,11,12,13,14,15,16,16,17,18,19,20,21,22,23,24,25,26,27,28,29,30,31,-1,-2,-3,-4,-5,-6,-7,-8,-9,-10,-11,-12,-13,-14,-15]
You might think now, «Bernat, have you gone mad? Why all the negative numbers?». Well I thought it could be useful to be able to define a refresh that needs to happen the last day of a month or the day before or so… I gave up at 15 days before the end of the month. We’ll see in a second how this plays out. Before that, let’s just say that we’ll store all the selected values separated by «|» and also a «|» character at the beginning and the end.
With that in mind the DefaultSelectedItems looks like this:
If(
    IsBlank(ThisItem.MonthDays),
    [],
    Split(
        Mid(
            ThisItem.MonthDays,
            2,
            Len(ThisItem.MonthDays) - 2
        ),
        "|"
    )
)
In other words, «if no info, return an empty array, if there is something, strip the first and last character and split the rest by the pipe character and build an array with that». That’s what this formula does. And that’s what we need too.
«Bernat stop! How are you planning to use this info in the PowerAutomate flow of Part 1? «
Wait! Let me just finish with the next control and then I’ll show you.
Days of the Week (cmbWeekdays)
This is quite similar to the previous control, but without negative stuff.
The Items property looks like this:
["Lunes","Martes","Miércoles","Jueves","Viernes","Sábado","Domingo"]
These are the days of the week in Spanish. I left them that way so we’ll learn how to get them in SQL too (*spoiler alert*)
The DefaultSelectedValues property looks like this
If(
    IsBlank(ThisItem.WeekDays),
    [],
    Split(
        Mid(
            ThisItem.WeekDays,
            2,
            Len(ThisItem.WeekDays) - 2
        ),
        "|"
    )
)
Yes it’s exactly the same as with month days but with week days.
Bringing Week day and month day frequency to the Refreshes…
Ok, finally, let’s get to it! This looks tricky at first, but is quite straight forward once you think about it enough. If you recall from Part 1, we had a view called DATASETS_PENDING and another called DATASETS_READY. Well, we don’t have to work with the complete list of the datasets anymore, we only have to deal with those that need to be refreshed today, by looking at the day of the week, and the day of the month in which we are. The regular day of the month, and the negative day of the month, meaning that the last day of the month is -1, the previous one -2 etc.
CREATE OR ALTER VIEW [pbi].[VIEW_DATASETS_PENDING] AS

WITH
    JOBS_COMPLETED AS (
        SELECT *
        FROM [dbo].[Executions]
        WHERE [end] >= CAST(DATEADD(DAY,-1,CONVERT(DATE,GETDATE())) AS datetime) + CAST('23:00' AS DATETIME)
            AND [status] = 'OK'
    ),
    DATASETS_COMPLETED AS (
        SELECT d.*,
        from [pbi].[Datasets] d
        INNER JOIN JOBS_COMPLETED j
            ON d.[job name] = j.[job name]
    ),
    DATASETS_PENDING AS (
        SELECT d.*
        FROM [pbi].[Datasets] d
        LEFT JOIN DATASETS_COMPLETED dc
            ON d.[dataset Id] = dc.[dataset id]
        WHERE dc.[dataset id] IS NULL
            AND d.RemoveDate IS NULL
            AND
	    (
		(
			/*Day of the week in Spanish (e.g. Miércoles)*/
			d.[WeekDays] like '%|' + UPPER(LEFT(FORMAT(GETDATE(),'dddd','es-ES'),1)) + SUBSTRING(FORMAT(GETDATE(),'dddd','es-ES'),2,100) + '|%'
			OR
			/*no configuration for day of the week*/
			d.[WeekDays]  IS NULL
		)
		AND
		(
			/*day of the month*/
			d.[MonthDays] like '%|' + CONVERT(NVARCHAR(50),DATEPART(DAY,GETDATE())) + '|%'
			OR
			/*megative day of the month (-1 the last day of the month)*/
			d.[MonthDays] like '%|' + CONVERT(NVARCHAR(50), DAY(GETDATE())-DAY(EOMONTH(GETDATE())) - 1) + '|%'
			OR
			/*no configuration by day of the month*/
			d.[MonthDays] IS NULL
		)
	    )

    )

    SELECT *,
        'https://app.powerbi.com/groups/' + [workspace id] + '/settings/datasets/' + [dataset id] AS "LINK"
    FROM DATASETS_PENDING
GO
You see it’s all about setting a filter to get the datasets that match the possible configurations specific to today, or either do not have configuration by day of the week or day of the month. The way I set up the filters is with AND between the filters of week day and month day. So depending on how you set them up, you may only get the system to refresh your dataset if we are on the 31st day of the month and it’s a Friday. Careful there. The default behavior is that datasets get refreshed every day.
In the «DATASETS_READY» view there’s also a subquery called «DATASETS_PENDING». We need to add the new filters there too.
Save button (btnSave)
Yes, we are still missing some controls. And this one is important. Is the one calling the stored procedure that will create or update the refresh on the «Datasets» table.
Here the key is the «OnSelect» property
NewOrModifyRefresh.Run(
    ThisItem.job_name,
    cmbDataset.Selected.Workspace_Name,
    cmbDataset.Selected.Workspace_Id,
    cmbDataset.Selected.Dataset_Name,
    cmbDataset.Selected.Dataset_Id,
    If(
        IsEmpty(cmbPrecedingJobs.SelectedItems),
        Blank(),
        Concat(
            cmbPrecedidngJobs.SelectedItems,
            JOB_NAME,
            "|"
        )
    ),
    "Dataset",
    If(
        IsEmpty(cmbWeekDays.SelectedItems),
        Blank(),
        "|" & Concat(
            cmbWeekDays.SelectedItems,
            Value
        ) & "|"
    ),
    If(
        IsEmpty(cmbMonthDays.SelectedItems),
        Blank(),
        "|" & Concat(
            cmbMonthDays.SelectedItems,
            Value
        ) & "|"
    ),cmbPriority.Selected.Value
);
The call itself is quite straightforward. You see that even though we are not showing the job_name field anywhere we can use it in the call because is part of the table defining the Vertical Gallery items. Also we can access easily the items of each control. The only tricky part is that for some combo boxes is not required to have any selection, like for day of the month or thay of the week. Actually you don’t even have to specify any preceeding jobs, but if so — why are you configuring the dataset here? maybe to get the unified log. So there are e few adge cases for that. Any way, if there’s no selection we should leave the field null in the SQL table, and if there’s at least 1 selection we need to concatenate the selected values. For the preceding jobs is enough to concatente the items with the pipe as delimiter. For the days of the month I added the pipe at the beginning and the end to void that on the 9th day of the month it refreshes a dataset that was supposed to be refreshed on the 19th day of the month. The query will look for either «|9|», «|-23|» or null. For the days of the week is probably safe to do it without the initial and final pile, but I added them just in case.
I could go on with the controls at the bottom, but they are exactly the same as the ones in the vertical gallery. The only difference is that there is no DefaultSelectedItems in any of the combo boxes. The other difference is that the Create Button needs to define the job_name that will be used. Because this is used as implicit primary key, we need to make sure is unique. It has to take the same role as the job name for the rest of procedures of the server, so GUIDs are not welcome. But using the dataset name followed by the workspace name in parenthesis should probably be good enough. If we are affraid that someone might create a duplicate we could add a hourstamp at the end with HHMMSS which should be good enough.
What about dataflows?
Yes, if you looked closely at the code you realize there’s an argument on the NewOrModify refresh which is just «Dataset». Indeed there’s a «@DatasetOrDataflow» argument to the stored procedure too that informs a «Dataset or Dataflow» column in the SQL Server table. Could we use this system to orquestrate dataflows too? Yes, absolutely. We only need to modify the «Items» property of the dataset dropdown (for both existing refreshes and new refreshes) so that it includes datasets and dataflows. We can put the dataset names in the same «Dataset_Name» column and «Dataflow_Id» under the «Dataset Id» column. And add a new column specifying if it is indeed a dataset or a dataflow.
I’m still thinking about it. One possibility is to build the table in the lakehouse and use that instead. Or maybe it’s even possible to do it directly inside powerapps. After all I already have a «Workspace_Dataflows» table in my lakehouse as it’s very easy to build starting from the JSONs of the scanner API (you really need to set it up! go check out Just’s blog if you haven’t yet — Rui Romano also created some awesome Azure function to achieve similar outcomes).
One little thing to be careful is that you can have a dataset and a dataflow with the exact same name. To avoid the ambiguity of which one are you selecting, you can add a » (dataflow)» suffix to all dataflows.
But wait a minute. What about the refreshes?
Indeed. Is not the same to launch the refresh of a dataset than that of a dataflow, and is not the same to check what was the latest refresh of a dataset than that of a dataflow. For starters, the API does not call them Dataflow refreshes. They are Dataflow transactions. Go figure. Anyway, doing anything in power automate looks huge, but from a programming perspective is quite simple. Every time we need to do something with the item in Power BI Service (for now datasets and dataflows, but one day pipelines may join the party) we create a switch statement on the item type.
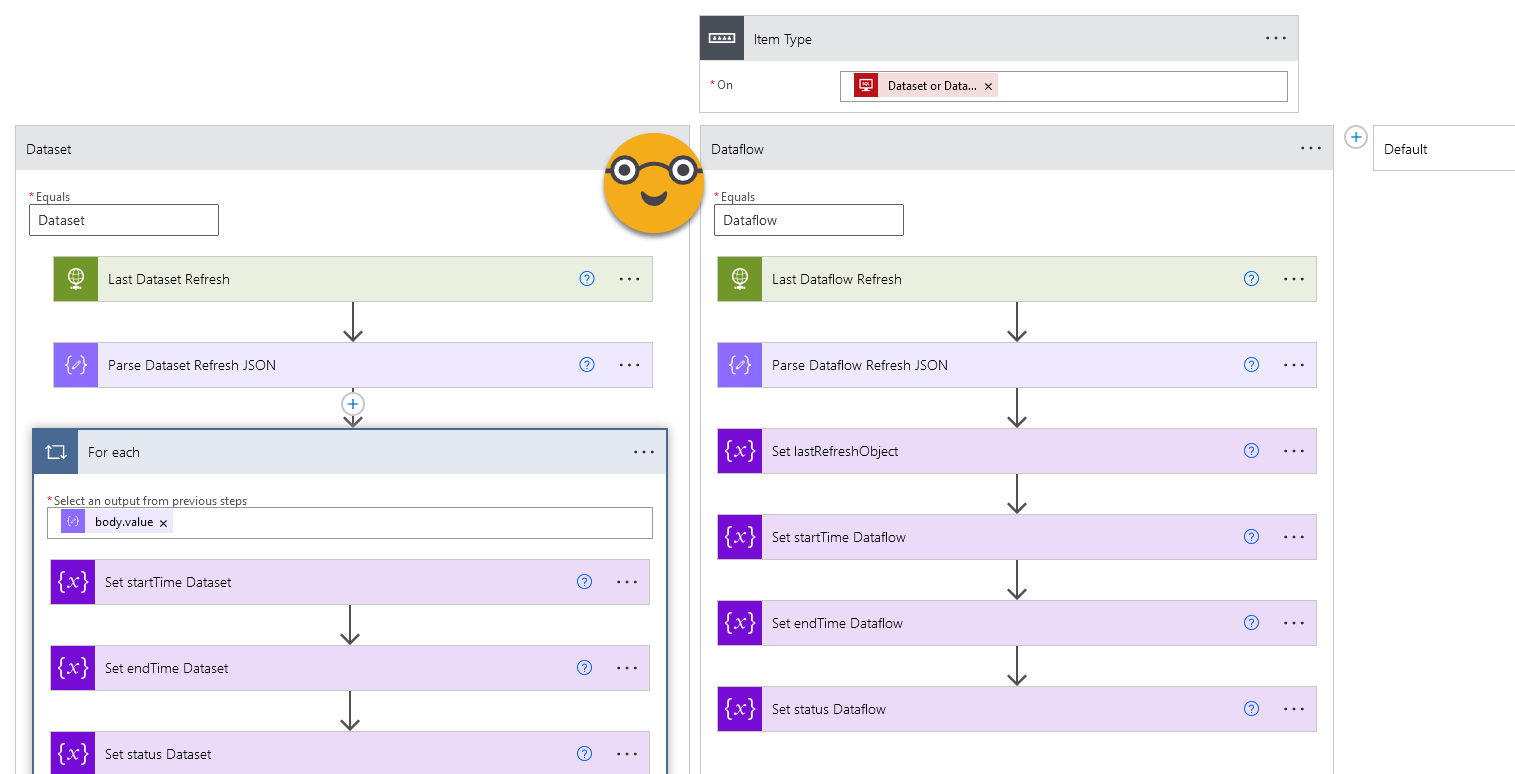
As you see now I take the time to store each of the properties of the JSON response into a variable. The reason is simple: when I check later when if the refresh happened in the last 8h, I cannot refer to the Parse JSON activity output because now I have two of them. So I refer to the variable. The same for status.

I’ll probably still have to fight a bit with the response from the dataflow API because it cannot be limited to the latest refresh, so we need to access the array and pick the first one there. But with some tears and sweat I guess it can be done.